


Why Humidity Makes or Breaks Your Hatching Success
If you ask experienced poultry keepers what the secret to a good hatch is, they’ll often point to something other than temperature. While heat is vital, humidity is the unsung hero that can make all the difference. Mastering the humidity for hatching eggs isn’t about a single setting; it’s about managing the constant exchange of moisture and air that gives an embryo life. Get it right, and you’ll see healthy chicks pip their shells. Get it wrong, and even the most fertile eggs can fail.
The Delicate Dance of Moisture and Air
An eggshell looks solid, but it’s actually a marvel of natural engineering, covered in up to 17,000 tiny pores. These pores allow the egg to “breathe.” During incubation, an egg needs to lose about 13-15% of its weight as water vapor escapes through these pores. This process is crucial because it creates the air sac at the blunt end of the egg.
This air pocket isn’t just wasted space—it’s the chick’s first supply of oxygen. Just before hatching, the chick pips internally, breaking into this sac to take its first breaths. If your incubator humidity is too high, not enough moisture escapes, and the air sac will be too small. This can cause the chick to drown or be too poorly positioned to break out. On the flip side, if humidity is too low, the egg loses too much moisture, leaving the chick dehydrated and too weak to hatch.
Debunking Dangerous Humidity Myths
One of the biggest mistakes newcomers make is thinking “the higher the humidity, the better,” especially when it’s time for lockdown. This can lead to disaster, resulting in “mushy” chicks that are too waterlogged to hatch properly. You’re aiming for a controlled, moist environment, not a sauna. You can learn more about finding that sweet spot in our detailed guide on incubation humidity.
You might also come across the “dry hatch” technique, which involves adding no water for the first 18 days. Some folks in naturally humid areas swear by it, but for most of us, it’s a huge gamble. You’re leaving your hatch entirely up to the mercy of your room’s ambient humidity, which can change without warning. A much safer bet is to actively manage the moisture inside your incubator.
Humidity Across the Incubation Timeline
The right humidity level isn’t something you set and forget. It changes based on where the embryo is in its development. For the first 18 days, the goal is to encourage steady moisture loss to form that all-important air sac. A relative humidity of 50-60% is the standard for this phase.
When you reach the lockdown period (the last few days before hatching), it’s time to change your approach. You’ll want to increase the humidity to 70-75%. This added moisture softens the shell and the inner membrane, preventing the dreaded “shrink-wrapping” effect and making it much easier for the chick to break free. This two-stage process gives the chick exactly what it needs, when it needs it. If you want to dive deeper, you can explore the science behind superior hatch rates and how professionals balance these elements.
To make it easier, here’s a quick breakdown of what the humidity should look like during the main stages of a typical chicken egg incubation.
Humidity Requirements by Incubation Stage
Breakdown of optimal humidity levels for each phase of egg incubation
| Incubation Stage | Days (Chicken) | Humidity Range (%) | Key Purpose |
|---|---|---|---|
| Setting to Pre-Lockdown | 1-18 | 50-60% | Allows for gradual moisture loss, forming a healthy air sac. |
| Lockdown & Hatching | 18-21 | 70-75% | Softens the shell and membrane, preventing ‘shrink-wrapping’. |
As you can see, the shift in humidity is deliberate. The lower level in the beginning helps the chick prepare, while the higher level at the end gives it the help it needs to emerge.
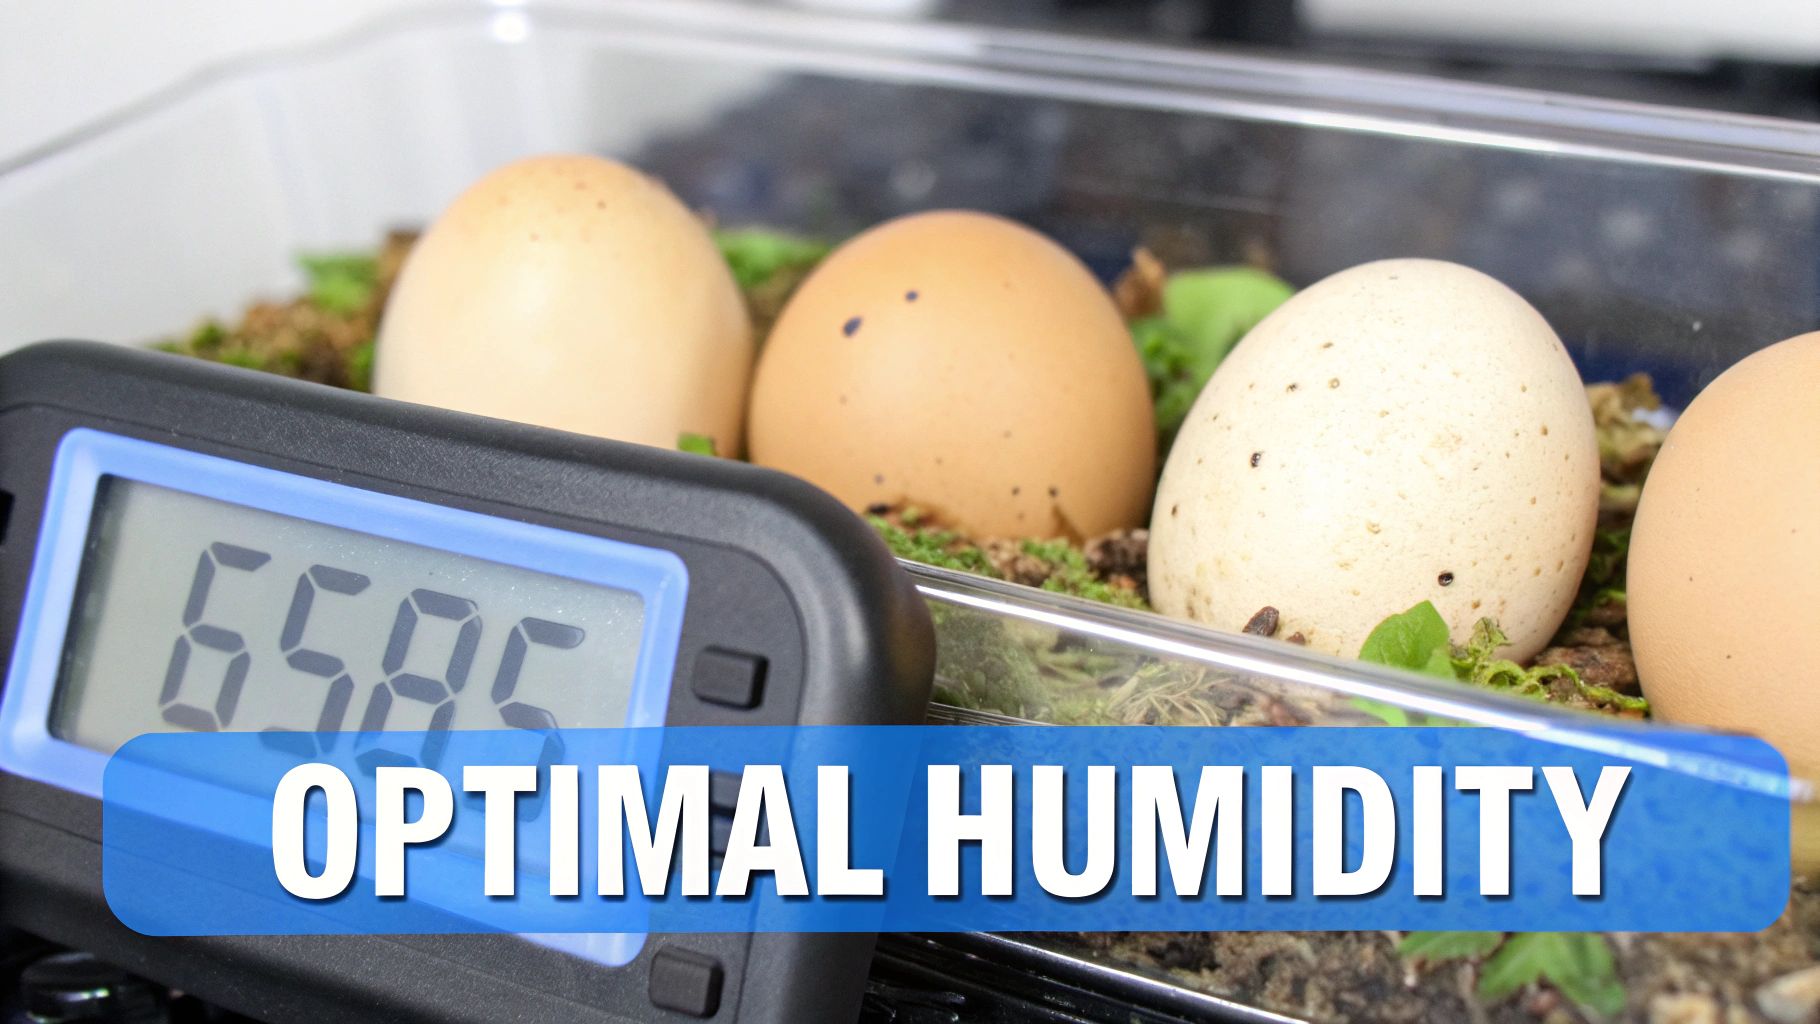
Building Your Humidity Monitoring Arsenal
If there’s one hard lesson many of us learn, it’s that the built-in display on your incubator can be misleading. Achieving the right humidity for hatching eggs isn’t just about having the tools; it’s about trusting them. Too many promising hatches are ruined by a faulty or poorly placed sensor, turning excitement into disappointment.
Digital vs. Analog: Picking the Right Hygrometer
The heart of your monitoring setup is the hygrometer, the device that measures relative humidity. To know your moisture levels, you need one you can depend on. You’ll see plenty of classic analog models, like the one pictured below, which can give you a general idea at a glance.
While those analog dials have a certain charm, most experienced breeders put their faith in digital models for their accuracy. A single percentage point can make a world of difference, and a digital hygrometer gives you a precise number, taking the guesswork out of the equation. For real convenience, a wireless digital hygrometer is a fantastic investment. These devices can send real-time data and alerts right to your phone, letting you know about any dangerous changes, even when you aren’t home.
The Secret to Accurate Readings: Sensor Placement
Even the best hygrometer on the market is worthless if it’s in the wrong spot. Humidity inside an incubator isn’t uniform; think of it as a tiny ecosystem with its own pockets of moist and dry air. A reading taken next to a vent will be completely different from one taken right over a water tray. This is a classic mistake that can derail a hatch.
To get a true measurement of what your eggs are experiencing, follow these simple placement guidelines:
- Position the sensor at egg-height. You need to know the conditions where the embryos are developing, not at the top of the incubator.
- Keep it away from the extremes. Place the sensor away from direct airflow from fans or vents and not directly over water reservoirs.
- Use a remote probe if you can. Many quality digital hygrometers come with a small sensor on a wire. This lets you position the probe perfectly among the eggs while keeping the main display unit outside for easy checking.
The Backup Plan: What to Do When Tech Fails
Every long-time breeder has a story about equipment failing at the worst possible time. A power flicker, a loose wire, or just old age can knock out your primary monitor. This often happens during the critical lockdown period when opening the incubator is a definite no-go. This is precisely why a backup isn’t a luxury; it’s a necessity.
A second, independently calibrated digital hygrometer is one of the smartest and most affordable pieces of insurance you can buy. Imagine it’s day 19, your incubator is sealed shut for lockdown, and the display suddenly goes dark. Without a backup, you’re flying blind, left to guess if the humidity is plummeting or skyrocketing. That second device is your lifeline, giving you the critical information you need to guide the hatch to a successful finish. Having reliable equipment is a huge piece of the puzzle, and you can learn how it all fits together in our full guide on how to incubate chicken eggs at home.
Protecting Your Investment Before Incubation Begins
A surprising number of hatches fail before an egg ever sees the inside of an incubator. The success of your hatch truly begins the moment an egg is laid, and how you store it beforehand is a critical, often overlooked, step. Getting this pre-incubation stage right, especially managing the humidity for hatching eggs, is key to protecting your investment and setting the stage for healthy chicks.
The Storage Environment Sweet Spot
Before you even think about incubator settings, you need to find a safe holding area for your eggs. You’re looking for a cool, stable spot. The refrigerator is out—it’s far too cold and dry. A warm kitchen counter is also a no-go. The ideal temperature range is between 10-15°C.
While a basement or cellar might seem perfect, be careful. They can be prone to mustiness and mould spores, which are sworn enemies of a porous eggshell. A cool utility room or pantry that’s out of direct sunlight and away from drafts is often a much safer bet.
The Delicate Humidity Balancing Act
This is the tightrope you have to walk, and it’s where many people get tripped up. An eggshell is porous, meaning it can lose precious moisture to the air around it. If your storage area is too dry, the egg will dehydrate long before incubation begins, resulting in a weak or non-viable embryo.
On the flip side, too much moisture is just as bad. It can cause condensation, or “sweating,” on the shells. This damp surface is an open invitation for bacteria to multiply and seep through the shell’s pores, contaminating the egg. Your goal is to prevent moisture loss without ever letting the shells get wet.
Handling Longer Storage Times
If you’re collecting eggs over several days to get a full batch for your incubator, your storage plan needs to adjust. Storing eggs for up to a week is usually fine in a cool room. But once you go past seven days, the risk of dehydration shoots up. This is where you have to actively manage the humidity.
Commercial hatcheries have known for years that for extended storage, they need to maintain a high humidity of 70-88% to keep eggs viable. This approach prevents the critical moisture loss that would otherwise doom a long-stored egg. You can get a glimpse of how professionals manage this on a large scale by looking into commercial egg hatchery humidification.
To create a good environment at home, here are a few tips I’ve learned:
- Always store your eggs with the pointed-end down in a clean egg carton. This keeps the air cell stable and in the proper position at the top.
- Avoid washing eggs unless you absolutely have to. Washing removes the “bloom,” which is the egg’s natural protective coating.
- If your storage room is very dry or you’re storing eggs for more than a week, place the cartons in a loosely covered box.
- Put a small, damp sponge or cloth inside the box to gently raise the humidity. Just make sure it doesn’t touch the eggs. Check it daily to keep it damp and to ensure no condensation is forming on the shells.
By paying close attention to these pre-incubation details, you give your eggs the absolute best start, ensuring they are perfectly conditioned for the crucial 21 days to come.
Tailoring Humidity for Different Species
Thinking you can pop chicken, duck, and quail eggs into the same incubator and get a great hatch is a common mistake that often leads to disappointment. The ideal humidity for hatching eggs isn’t a one-size-fits-all setting. Each species has unique needs based on everything from its shell thickness to the environment it evolved in. Nailing this is about giving each egg type exactly what it needs to develop properly.
Just a few percentage points can make a huge difference in your results.
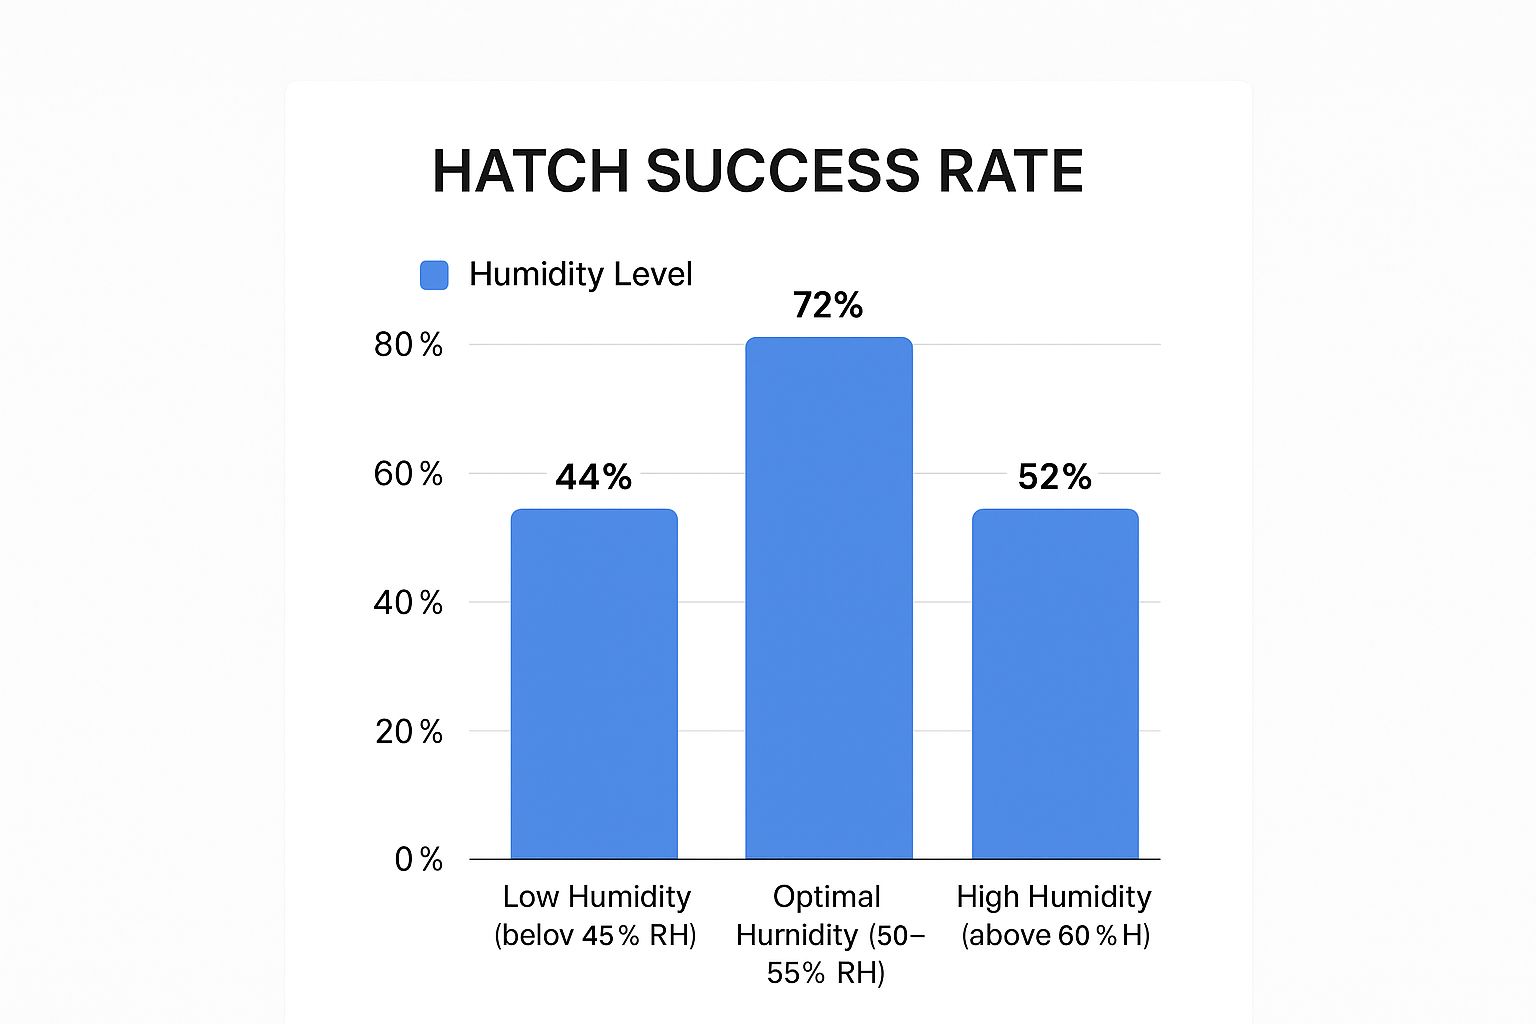
As you can see, there’s a definite “sweet spot” for humidity. Straying too far in either direction can seriously lower your chances of a successful hatch, emphasizing why getting it right is so important.
To make things easier, we’ve put together a quick reference table. It breaks down the recommended humidity levels and other key details for the most common species you might be hatching.
Species-Specific Humidity Requirements
Optimal humidity levels for different poultry and waterfowl species throughout incubation
| Species | Early Stage Humidity (%) | Lockdown Humidity (%) | Incubation Period (Days) | Special Considerations |
|---|---|---|---|---|
| Chicken | 50-55% | 65-70% | 21 | Standard requirements for land birds. |
| Turkey | 50-55% | 65-70% | 28 | Long incubation period; small errors can compound. |
| Duck | 55-60% | 75-80% | 28 | Thicker shell; benefits from daily cooling and misting. |
| Goose | ~60% | 75-80%+ | 28-32 | Very thick shell; needs consistently high humidity. |
| Quail | 45-50% | 65-70% | 17 | Small size means they lose moisture very quickly. |
The main takeaway here is the clear difference between land birds and waterfowl. Pay close attention to these guidelines, as they form the foundation for a successful multi-species hatch.
Waterfowl vs. Land Birds: A Tale of Two Shells
The biggest split in humidity needs is between waterfowl and common land birds. Chickens and turkeys do well with a straightforward approach: maintain around 50-55% relative humidity (RH) for the first phase, then bump it up to 65-70% for the final lockdown period. Their shells are porous enough for proper moisture exchange at these levels.
Ducks and geese, however, are in a league of their own. Their eggs have thicker, less porous shells, which is a natural adaptation to protect the embryo in a damp, waterside nest. To hit the target weight loss of 13-14%, they simply need more moisture. For duck eggs, I start at 55-60% RH, and goose eggs often need a bit more, closer to 60%. Come lockdown, you’ll want to increase that to 75-80% or even slightly higher. A great tip from experienced breeders is to cool and mist waterfowl eggs daily from week two until lockdown, which mimics the mother returning to the nest with wet feathers.
The Unique Challenges of Quail and Turkey Eggs
It’s not just about the water-loving birds. Tiny eggs, like those from quail, have their own set of rules. With their small size and a quick incubation of just 17 days, they can lose moisture incredibly fast. A humidity mistake that a chicken egg could recover from might be fatal for a quail embryo. I’ve found that a steady 45-50% RH is ideal for the first 14 days, before raising it to 65-70% for the hatch. Their sensitivity means you have to be extra vigilant with your hygrometer. For a full guide, check out our post on how to hatch quail eggs.
Turkey eggs sit at the other end of the spectrum with their long 28-day incubation. While their humidity needs are similar to chickens, the extended timeline means even a small, consistent error can add up over four weeks and result in a very poor hatch.
Juggling Different Species in One Incubator
So, what do you do when you want to hatch a mixed batch of eggs? This is a frequent puzzle for backyard poultry keepers. Ideally, you should only incubate eggs with similar needs at the same time. If you must mix them, here are a few strategies that can help:
- Find a middle ground: Set your incubator to a compromise humidity, like 55%, which is a bit high for chickens but a bit low for ducks. It’s not perfect, but it can work.
- Add targeted moisture: When you open the incubator for daily egg turning, give only the waterfowl eggs a light spritz with lukewarm water. This boosts their local humidity without impacting the others too much.
- Strategic placement: Try placing the eggs that need higher humidity (ducks, geese) closer to the incubator’s water channels. In a forced-air model, this has less effect, but it can help in a still-air incubator.
When in doubt, always cater to the needs of the most sensitive or demanding species in your incubator.
Navigating Humidity Changes Throughout Development
A successful hatch isn’t about setting the humidity and walking away. It’s more of a delicate dance, involving small, mindful adjustments that seasoned breeders learn over time. The real craft of managing **humidity for hatching eggs** comes from understanding the key moments during development. Making the right tweaks at the right time can significantly improve your results, whereas a hands-off approach can lead to disappointment.
The Art of Gradual Adjustments
Think of the developing embryo as a very sensitive passenger; abrupt shifts in humidity can be a shock to its system. This is why a gradual approach is always best. For example, imagine a warm, humid weather front moves into your area, and the humidity in your room jumps from 50% to 75%. Your incubator, set to 55% RH, will struggle because the air it’s pulling in is already saturated. Instead of letting the machine work overtime, you might need to step in and remove one of the water channels to balance things out.
Here’s another common scenario: you’re candling eggs on day 14 and notice the air sacs are smaller than you’d like. This is a classic indicator of too much humidity. The fix isn’t to panic and remove all the water, which would cause a sharp drop. A better move is to make a small, controlled change, like uncovering a vent hole or switching to a smaller water tray. This gently lowers the humidity by a few percentage points and encourages a bit more moisture loss over the next few days. It’s all about thoughtful corrections, not dramatic swings.
Recognizing Early Warning Signs
To make effective adjustments, you have to spot the signs early. Your most valuable tools here are a candler and a simple kitchen scale. While candling gives you a visual of the air sac, weighing your eggs provides hard data. Most experienced breeders aim for a total weight loss of about 13-14% by lockdown. If you find your eggs have only lost 5% of their weight by day 14, you know your humidity is too high. This is particularly important for waterfowl, as their thicker shells can influence moisture loss. You can learn more about their unique requirements in our guide on the duck incubation period.
Keep an eye out for these common signs:
- Small, underdeveloped air sacs: This usually means your humidity is too high.
- Unusually large air sacs: The eggs are drying out too fast; your humidity is too low.
- Constant condensation on the viewing window: This is a major red flag that humidity is dangerously high.
- Slow or stalled development: While many factors can cause this, incorrect humidity adds a lot of stress to the embryo.
Document Everything for Future Success
One of the best habits you can form is keeping a detailed log for every hatch. This isn’t just for people who love data; it’s your personal instruction manual for future hatches. A simple notebook is perfect for this. Each day, write down the temperature and humidity in your incubator. Crucially, log any changes you make. For example: ‘Day 12: Air sacs look a bit small. Removed one water channel. RH dropped from 58% to 52% over 4 hours.’
Also, make notes on your candling results and any outside factors, like a sudden change in weather. This record becomes priceless. When you have an amazing hatch with a 95% success rate, you can look back at your notes to see exactly what you did. And when a hatch doesn’t go as planned, your log helps you diagnose what went wrong. It turns every hatch—good or bad—into a learning opportunity.
Mastering the High-Stakes Lockdown Period
The final three days of incubation, what we call the “lockdown,” is the nail-biting conclusion to all your careful work. This isn’t the moment to get complacent; managing the humidity for hatching eggs becomes the single most important job. So many hatches that were perfect up to this point can fail in this last stretch. During lockdown, you’ll stop turning the eggs entirely, close up the incubator, and wait for the magic to happen. The biggest change you’ll make is a big, intentional jump in humidity.
Why the Sudden Spike in Humidity?
So, why do we suddenly crank up the moisture? This jump, usually from about 55% to a much higher 65-75%, plays a couple of huge roles. For 18 days, the egg has been slowly losing moisture to form a healthy air sac. Now, the chick needs the opposite. The high humidity softens the eggshell itself, making it much easier for a tiny chick to pip through.
Even more importantly, it keeps the inner membrane from drying out. If that membrane becomes dry as the chick hatches, it can stick to the chick’s feathers like glue. We call this “shrink-wrapping,” and it’s a heartbreaking situation. A shrink-wrapped chick is effectively trapped, unable to turn and “zip” its way out of the shell. This often leads to exhaustion and, sadly, death.
You’ll want to make this transition carefully. Don’t just pour a bunch of cold water in at the last minute, as this can cause condensation and shock the eggs. A few hours before day 18 hits, start adding lukewarm water to the incubator’s channels. If you find you need an extra boost, a clean, damp sponge works wonders by adding a lot of surface area for evaporation. The aim is a slow, steady climb to your lockdown humidity target.
The Fine Line Between Helping and Harming
One of the most difficult parts of lockdown is getting this high humidity without sacrificing air quality. The chicks have pipped internally into the air sac and are now using their lungs. They need fresh oxygen to survive. It can be tempting, but you should never block your incubator’s vents to try and raise the humidity. A well-designed machine can maintain proper airflow even with high moisture, and you have to trust that design.
This is also where your self-control will be put to the ultimate test. You’ll see the first tiny pip in a shell, maybe hear a faint peep, and then… nothing. For what feels like an eternity. The desire to open the incubator “just for a second” to check on them or “help them out” can be overwhelming. You must resist.
Opening the lid, even for a moment, causes a massive drop in both temperature and humidity. This sudden change can instantly shrink-wrap the very chick you were hoping to help. A healthy chick can take 24 hours or even more from the first pip to finally pushing its way out. It’s resting, absorbing the last of the yolk sac, and gathering strength. This is where investing in a quality automatic egg incubator pays for itself in peace of mind. Knowing your machine is holding stable conditions allows you to let nature run its course. Trust the chick, trust your incubator, and give them the time they need.
Solving Humidity Problems When Things Go Wrong
Even with the most careful planning, things can go sideways. A sudden rainy spell or an old incubator seal can send your humidity levels into a spin. These are the moments that can keep any breeder up at night. Knowing how to troubleshoot these problems quickly is what often separates a great hatch from a disappointing one. It’s all about how you react when the numbers on your hygrometer drift into the danger zone, a vital skill when managing the humidity for hatching eggs.
When Humidity Is Stubbornly Low
It’s a common headache, especially during lockdown: you’ve filled the water channels, but the humidity just won’t climb into that crucial 65-75% range. Before you start to worry, take a look at the room itself. A very dry room, perhaps from central heating, forces your incubator to work overtime.
The easiest fix isn’t just adding more water, but increasing the water’s surface area. Try placing a clean, new sponge into one of the water channels. This simple trick dramatically increases evaporation without risking an overflow. It’s also a good time to carefully inspect the incubator’s seals. A tiny, hard-to-see gap in an old or poorly fitting lid can constantly let that precious humid air escape.
Dealing with Unexpected Humidity Spikes
The opposite problem can be just as alarming. You glance at your hygrometer and see it’s reading 85% when it should be much lower. This often happens when the weather turns damp and rainy, and the air in your home is already heavy with moisture.
If your humidity is creeping up, the first thing to do is slightly increase ventilation, if your incubator model has adjustable vents. This helps push some of the excess moisture out. If that doesn’t do the trick, you might need to remove water from one of the channels. The key is to make small, gradual changes. A sudden drop in humidity can be just as stressful for the developing embryos.
Crisis Management: Power Cuts and Equipment Failures
This is the scenario every poultry keeper dreads. A power cut during lockdown or a equipment malfunction right around day 18 can feel like a disaster. If the power goes out, your number one priority is insulation.
Do not open the incubator. Instead, immediately cover the entire unit with thick blankets or a duvet to trap as much heat and humidity as possible. This can help the eggs ride out a short outage. If your main hygrometer fails, your backup becomes your lifeline—without one, you’re flying blind. And if you discover your humidity has been wrong for days? Don’t give up. Correct it to the proper level and see the hatch through. Chicks can be remarkably resilient.
Learning from a Disappointing Hatch
Sometimes, despite your best efforts, a hatch just doesn’t go to plan. It’s a tough moment, but it’s also an incredibly valuable learning opportunity. Before you clean out the incubator, take some time to do a “post-mortem” on the eggs that didn’t make it.
Examining the unhatched eggs can give you clear clues:
- A fully developed chick that seems wet or “mushy” in a shell with a small air sac suggests humidity was too high, effectively drowning the chick.
- A chick that is stuck to a dry, tough membrane, often described as “shrink-wrapped,” is a classic sign that humidity was far too low.
Compare these physical clues with the notes in your incubation log. This analysis is the single best way to pinpoint what went wrong and refine your technique for the next batch.
Of course, starting with the best possible foundation is half the battle. Sourcing high-quality, viable eggs from the start makes a world of difference. Explore our premium selection at HatchingEggs.eu to give your next hatch the greatest chance of success.