


What Your Eggs Are Really Telling You Through The Shell

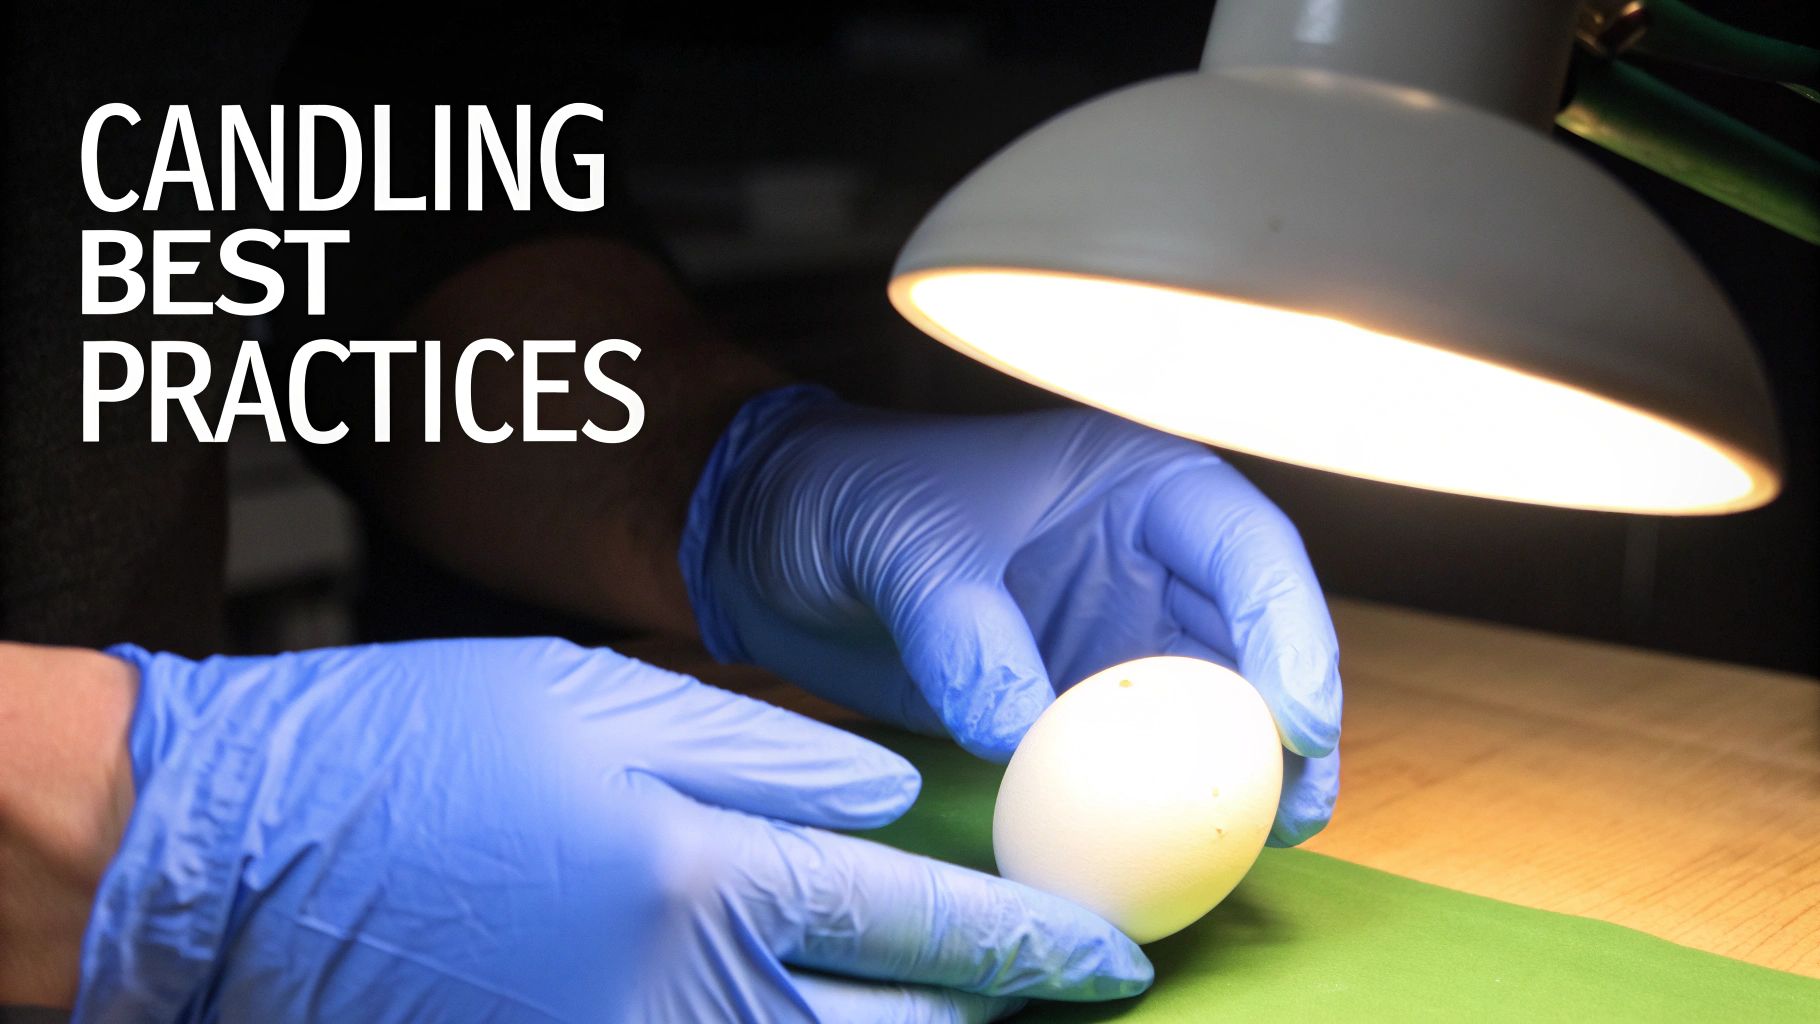
This image shows candling in action. You’re using a bright light in a dark room to see inside the egg. Look closely–you can see the shadow of the developing chick! This helps us breeders check on the little one’s progress.
Candling isn’t just about a simple “yes” or “no” for fertility. It’s more like learning a secret language. I’ve candled thousands of eggs, and honestly, experience is key.
You’ll start noticing things like how the blood vessels grow like a tiny spiderweb. Or how the egg gets darker as the chick grows bigger. Even the air sac changes!
These little details tell a much bigger story than just “fertile” or “infertile.” Want to learn more about chick development? Check out this resource: Chicken Egg Development Stages.
One thing that trips up new breeders is expecting every egg to look like a textbook diagram. Those diagrams are helpful, but real life is a bit messier.
Shell thickness, for instance, can make a big difference. A thicker shell can hide early development. So, a perfectly good egg might look empty for the first few days. Don’t get discouraged! Give those eggs a bit more time.
It’s helpful to think about overall trends too. For example, the total fertility rate in England and Wales has been dropping since 2010, down to 1.49 children per woman in 2022. This shows how family planning and the age of first-time mothers are changing. Find out more here: Discover more insights. Just like with human birth rates, recognizing slow development in your eggs (versus a true failure) takes practice.
Candling is all about understanding those little differences, the variations, the hints that show you each egg’s potential. It’s a learning process, and the more you do it, the better you’ll get at deciphering the messages inside those shells.
Building Your Candling Setup For Consistent Results
Getting your candling setup right is key for accurate results. Trust me, I’ve seen even seasoned breeders fumble with this. But don’t worry, you don’t need a fancy lab! Some of my most effective setups involved simple household items. The main things are darkness, the right light, and proper egg handling.
First, darkness is your friend. Not just dim, but truly dark. Think blackout curtains level of dark. This boosts the contrast inside the egg, letting you see those little details much easier. I’ve even used a cardboard box with a hole cut out for the light – surprisingly effective!
Then there’s the light source. Too bright, and you risk cooking those little embryos. Too dim, and you’ll miss important development signs. I like a small, bright LED flashlight (LED Flashlight) with a focused beam. A handy trick is to modify it with some card or foil to create a smaller opening, concentrating the light where you need it. This also minimizes glare and makes things easier to see.
Finally, handle those eggs with care. Gently hold the egg against the light, bigger end up. Slowly rotating it reveals different parts of the developing embryo, especially those early blood vessels.
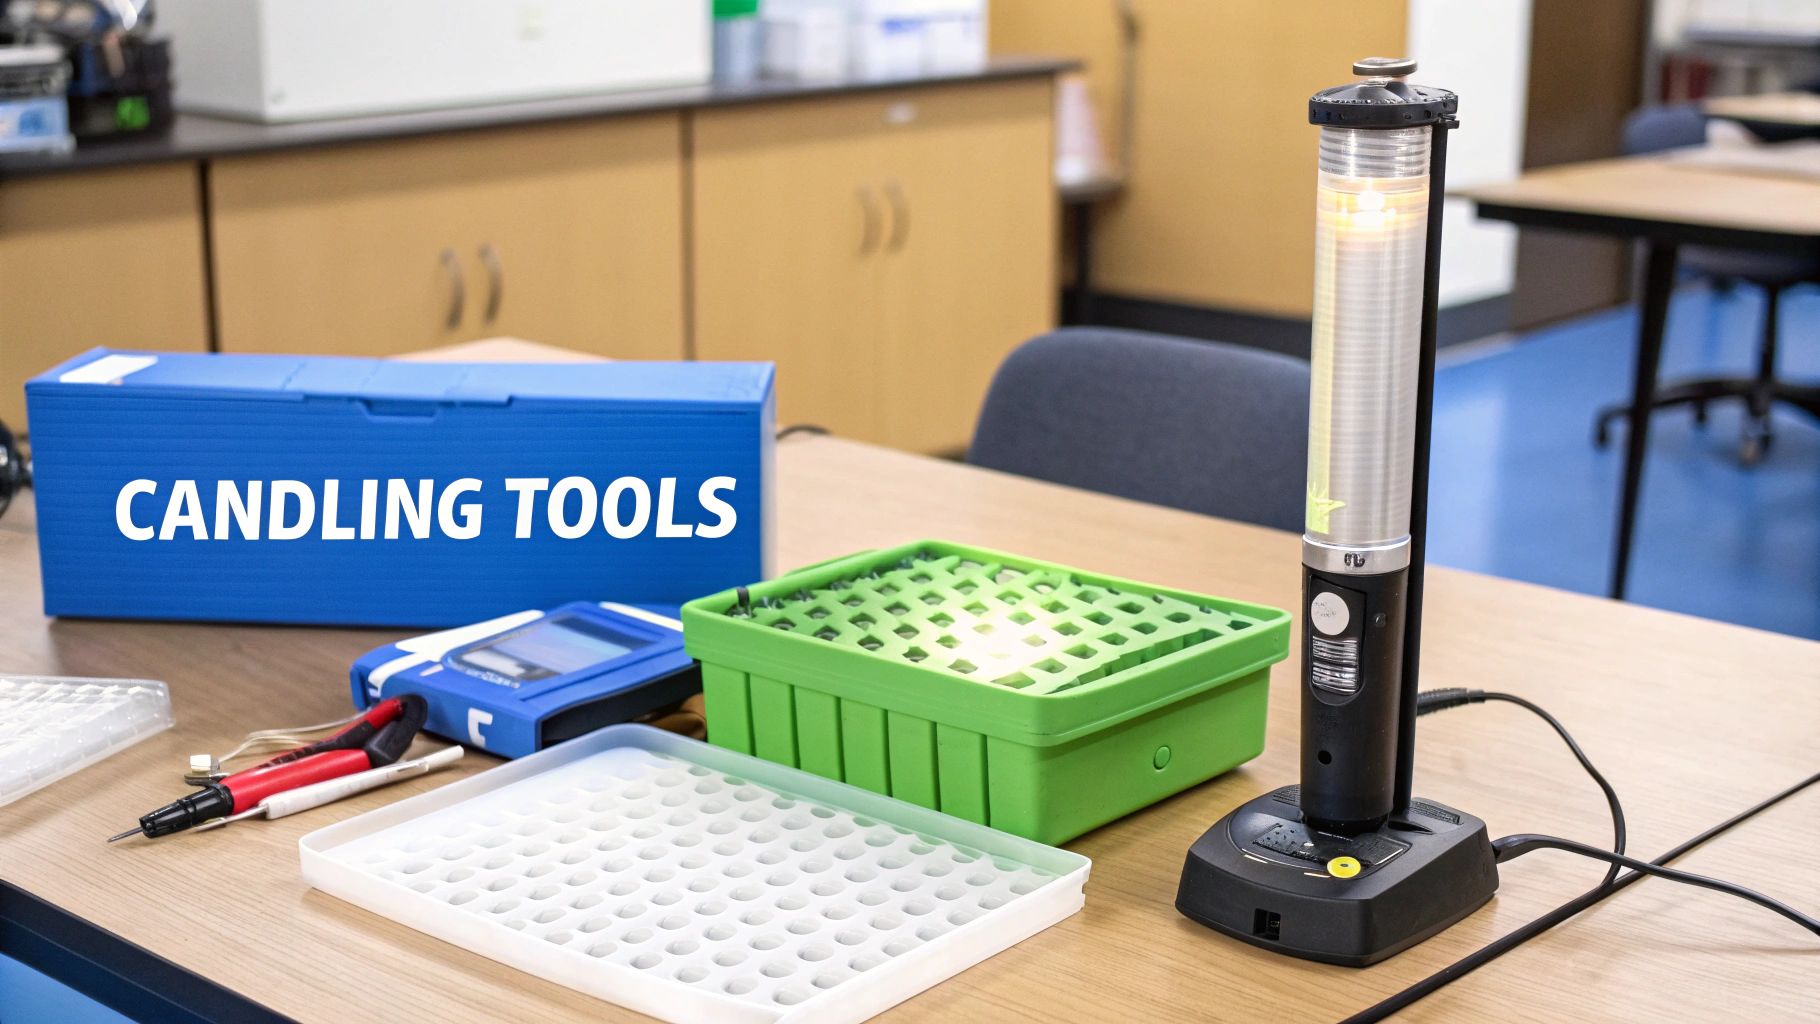
Choosing Your Candling Tools
To help you select the perfect candling tool, I’ve put together this comparison table. It outlines the pros and cons of different options based on egg size, shell color, cost, and accuracy.
Essential Candling Equipment Comparison:
| Equipment Type | Best For | Cost Range | Accuracy Level |
|---|---|---|---|
| Bright LED Flashlight | Beginners, most egg types | $5 – $20 | Medium |
| Dedicated Candler | Frequent candling, dark-colored eggs | $20 – $50 | High |
| Professional Candling Lamp | Large-scale operations, all egg types | $50+ | Very High |
This table should give you a starting point when selecting equipment. Remember, the best tool depends on your specific needs and budget.
Now you’re ready to boost your incubation success! You might also want to check out this helpful guide: How to Incubate Chicken Eggs at Home. Remember that room temperature matters too. A cold room can mess with your candling accuracy, so aim for a comfortable, steady temperature during your candling sessions. These simple steps can transform your candling from guesswork to a reliable tool.
Recognizing Development Patterns That Predict Success
Candling eggs goes from a simple check to a real art form with practice. It’s all about picking up on the subtle visual clues that tell the story of each egg. After candling a bunch of eggs over a few hatches, you’ll start noticing patterns that can predict what’s going to happen days before you’d normally be able to tell.
One of the first things you’ll learn to spot is the development of blood vessels. Instead of a dark blob, you’ll begin to see these intricate little networks forming, like tiny branching trees. These early vascular patterns are a super important sign of a healthy embryo. With time, you’ll move beyond the textbook illustrations and develop a real feel for healthy blood vessel development. Trust me, there’s no substitute for that hands-on experience.
You’ll also see how these vascular patterns change over the incubation period. At first, they’re these thin, spiderweb-like threads. As the embryo grows, the vessels become thicker and more defined. You might even see a little wiggle in there! That’s always a special moment. A strong, quickly expanding network of blood vessels usually means you’re going to have a healthy, active chick. On the flip side, weak, scattered vessels, or vessels that stop growing, can be a sign that the embryo is struggling. For more hatching tips, especially for waterfowl, you might find this helpful: How to hatch duck eggs at home.
Interpreting Growth Stages and Variations
Every egg develops at its own pace. Some might show fast early development, then seem to pause for a bit. This can be a little nerve-wracking for beginners, but it’s often perfectly normal. Different breeds, and even individual genetic lines within a breed, can have slightly different development patterns. This is where careful observation and good record-keeping come in handy. By keeping track of these variations, you’ll learn a lot about the specific traits of your flock.
It’s interesting to see how these same principles of growth and development pop up in other areas, even ones completely unrelated to poultry. For example, in the UK, fertility treatments have seen some significant changes. Between 2019 and 2022, egg storage cycles increased by a whopping 81%, from about 2,500 to 4,600 cycles. This shows how important it is to understand developmental stages and anticipate changes, no matter what the field. Learn more about fertility trends here.
By combining close observation with a real understanding of your breeds and individual lines, you’ll become much better at interpreting the subtle signs of developing embryos. This helps you decide which eggs are most likely to hatch successfully.
Avoiding The Mistakes That Destroy Hatch Rates
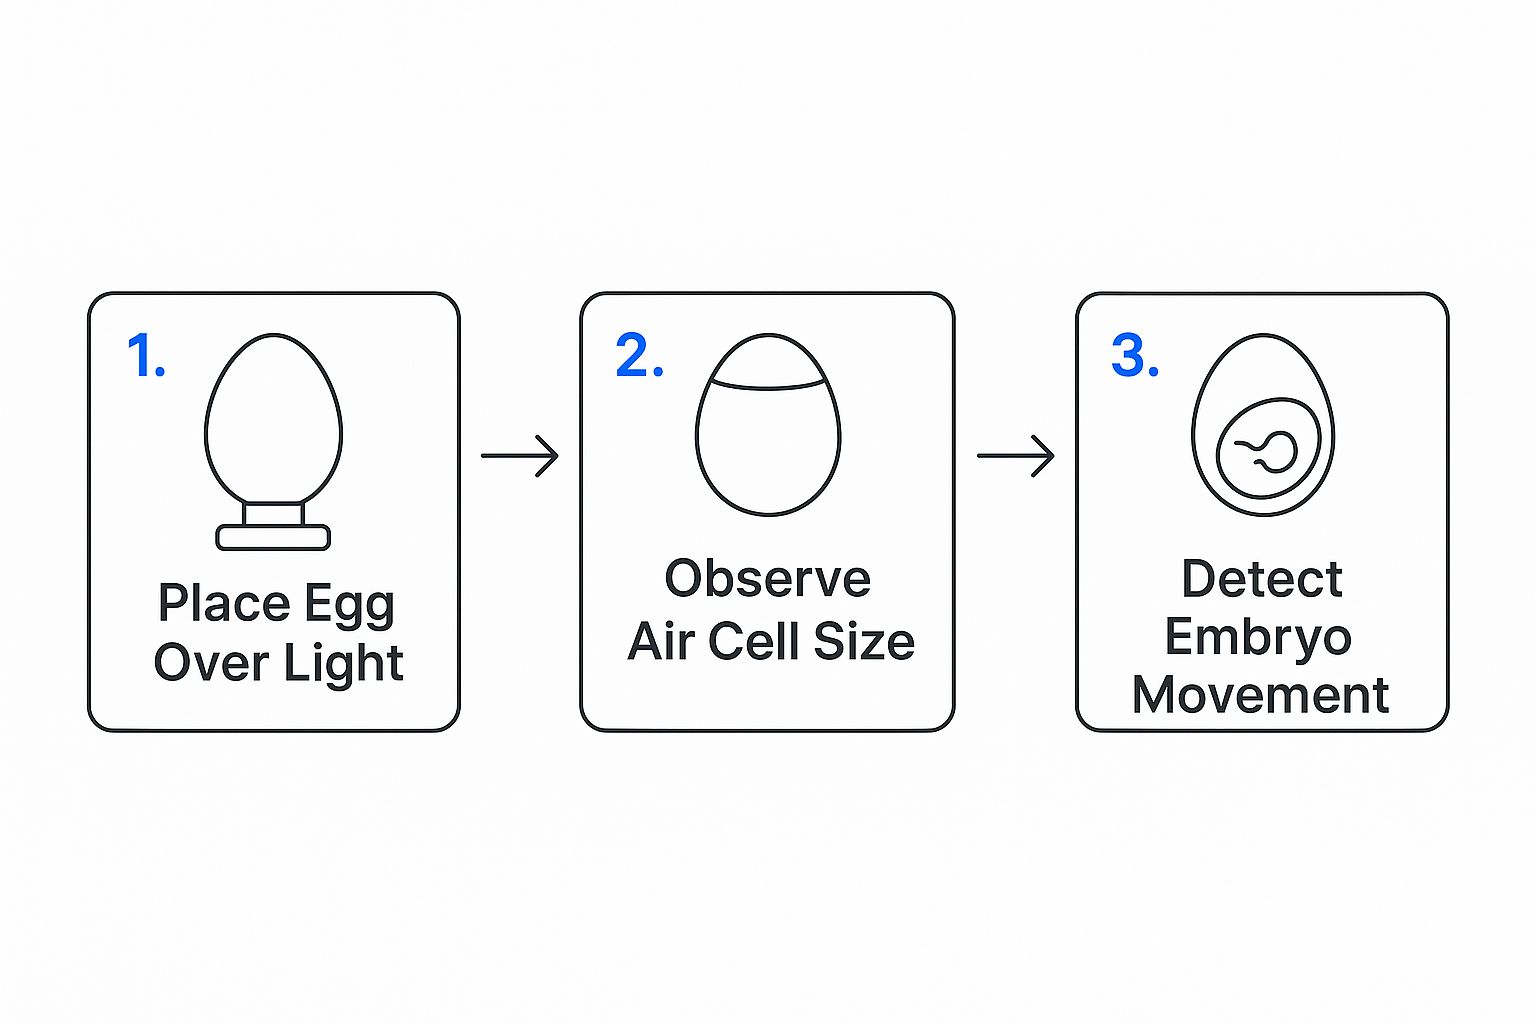
This infographic shows the basics of candling: light, egg, look. Seems simple enough, but trust me, the real magic is in the details. Candling gives you a peek inside, helping you figure out what’s going on with your precious eggs.
Now, let’s talk about mistakes – we all make them! I’ve learned some expensive lessons over the years, and I still see folks making the same ones. One of the biggest culprits is over-handling. It’s tempting to check on your eggs constantly, but all that in and out of the incubator can really throw off the temperature and humidity. More handling can actually mean fewer chicks! For a good guide on timing, check out this article on When to Candle Chicken Eggs.
Another common pitfall? Misinterpreting what you see. Eggs develop at their own pace. Some are late bloomers, and others might have little quirks that look weird but are totally normal. I remember one egg in particular. At day 7, it looked completely clear – I thought it was a dud. But something told me to give it another chance. Sure enough, at day 14, there was a healthy embryo! That little chick turned out to be one of the strongest of the bunch.
Incubation Conditions and Candling
Your incubator setup also plays a role in what you see during candling. If your temperatures are fluctuating, you might get some confusing readings that make it tough to accurately assess development. This reminds me of something interesting happening in the UK with fertility treatments. Advances in IVF have dramatically reduced multiple births, dropping from 28% in the 1990s to just 5% in 2021. It shows how understanding the science, just like with our eggs, can make a huge difference. Read the full research here.
Here’s a handy table I put together to help you figure out the best times to candle, depending on what kind of poultry you’re raising. This schedule balances getting enough information with not disturbing the eggs too much.
Candling Schedule for Maximum Accuracy
Optimal timing and frequency for candling different poultry species without compromising hatch rates
| Species | First Candling Day | Second Candling Day | Final Check Day | Maximum Sessions |
|---|---|---|---|---|
| Chicken | 7 | 14 | 18 | 3 |
| Duck | 8 | 15 | 25 | 3 |
| Goose | 10 | 20 | 28 | 3 |
| Turkey | 10 | 20 | 25 | 3 |
| Quail | 7 | 14 | 16 | 3 |
This table is just a guideline. You can adjust it a bit based on your own experience and setup. The key is to find what works best for you and your birds.
So, put down the candler and take a deep breath! Too much checking and worrying can actually hurt your hatch rates. Trust your instincts, remember that variation is normal, and pay attention to how your incubator influences what you see. By avoiding these common mistakes and listening to what your eggs are telling you, you’ll be hatching healthy, strong chicks in no time!
Making Smart Decisions With Borderline Cases
Let’s face it, candling can be tricky. The biggest head-scratchers? Those borderline cases. The ones that don’t look quite right, the late bloomers, the ones with weird veins, or those that seem to stop developing and then magically start again. These are the ones that make even seasoned breeders question everything.
One common scenario is the slowpoke. An egg might look clear on day 7, leading you to believe it’s infertile. But sometimes, these little guys just need more time. Things like the hen’s diet and even how the eggs were stored before incubation can affect early development. I’ve personally had eggs that looked totally clear on day 7, then BAM! A healthy embryo appears a week later. Remember, not every egg follows the same schedule.
You might be interested in: Duck Incubation Period
Another tricky situation? Strange blood vessel patterns. Normally, you’d see a nice network of vessels branching out from the embryo. But sometimes, things look a little…off. Maybe the veins are thinner or more spread out than you’d expect. This doesn’t automatically mean trouble. It could just be a genetic quirk, especially if you’re working with different breeds.
My Framework for Borderline Eggs
So, what do you do with these borderline eggs? I use a combination of observation, patience, and a little bit of breeder’s intuition. Here’s what I do:
- Give them time: If I see even a hint of development, I give it another week at least. Sometimes, a slow start isn’t a bad thing.
- Consider the breed: With a new breed or line, I’m more likely to give borderline eggs a chance. Unusual patterns might just be their normal.
- Look for changes: Instead of worrying about “perfect,” I look for signs of progress. Is the air sac growing? Are those unusual veins getting bigger or clearer?
- Trust your gut: Sometimes, even with all the logic, you get a feeling about an egg. Don’t ignore it – it can be surprisingly accurate!
By using these strategies, you can make smarter choices about your borderline eggs, giving you a better chance of hatching those unexpected chicks. It’s all about balancing hope with realism.
Using Candling Data To Improve Your Breeding Program
Smart breeders know that candling isn’t just about checking for a heartbeat. It’s about gathering valuable intel that can take their whole breeding operation to the next level. Think of each candling session like collecting data points. Over time, these data points reveal patterns about your flock’s reproductive health and performance.
For example, let’s say you’re candling eggs from three hens, all paired with the same rooster. You notice Hen A’s eggs consistently show strong, early vein development. Hen B’s eggs, on the other hand, show slower, less consistent development. And Hen C’s? Consistently clear. This tells you something important about each hen. Hen A is a rockstar! Hen B might have some underlying issues impacting her egg quality. And Hen C? Well, candling just gave you an early warning that she might need replacing.
Tracking Candling Results for Long-Term Gains
Keeping good records is key here. A simple spreadsheet or even a dedicated notebook can become your secret weapon. Jot down the date, the hen and rooster IDs, and your candling observations for each egg. After a few hatches, you’ll begin to see which pairings produce the strongest embryos, which hens consistently lay fertile eggs, and even how the time of year impacts your overall hatch rates.
This means your candling data isn’t just a snapshot; it’s a long-term investment in your breeding program. You’ll start to recognize patterns that could point to hidden problems. For example, a batch of weak embryos could indicate your breeder feed needs more calcium. Or, repeated early embryonic deaths might signal a genetic issue within a particular breeding line.
Making Data-Driven Breeding Decisions
Armed with this information, you can make informed decisions to optimize your breeding program. You’ll know exactly when to replace underperforming hens, which breeding pairs to prioritize for the best fertility, and even if you need to tweak your incubation setup. These smart choices can dramatically boost your hatch rates over time.
So, candling is much more than a simple check-up; it’s a powerful tool for serious breeders. By learning to interpret the subtle clues hidden within each egg, you’ll gain a deeper understanding of your flock’s reproductive dynamics and unlock the potential for greater success. Want to give your breeding program a boost? Check out HatchingEggs.eu for premium hatching eggs from carefully selected breeding stock.