


Mastering The Perfect Chicken Egg Incubation Temperature
Getting the chicken egg incubation temperature just right is absolutely essential if you’re aiming for a successful hatch. Think of it like a carefully controlled scientific experiment where precision is key; even small variations can spoil your results. This accuracy is so important because throughout the crucial 21-day incubation period, the temperature directly influences the complex development happening inside every egg.
Slight deviations from the ideal chicken egg incubation temperature can have a big impact on your hatch success. The embryo’s metabolic rate and how quickly it develops are directly tied to the warmth it receives. If it’s too cool, development can slow down or even stop altogether. If it’s too warm, development might speed up too much, often causing abnormalities or even the death of the embryo. For poultry keepers, particularly in the UK, maintaining that perfect warmth is the foundation of a good hatch. The most widely recommended incubation temperature for chicken eggs is between 37.5°C and 37.8°C (99.5°F–100°F). Holding this temperature steady is vital, as studies show hatch rates can fall sharply if temperatures move by more than 0.5°C from this optimal setting. You can delve deeper into poultry science research on this topic.
This specific temperature range isn’t just a random suggestion; it’s precisely what a developing chick needs. Consistent warmth ensures that cells divide correctly, organs form as they should, and the chick grows strong enough to tackle the tough job of hatching. Any major temperature swings can disrupt these delicate biological processes.
Temperature Ranges and Hatch Rate Performance
To really grasp how much the chicken egg incubation temperature matters, it’s useful to look at how different temperature settings can affect your hatch. The table below presents a comparison of various temperature settings and their expected hatch rates, drawing on UK poultry research.
Temperature Ranges and Hatch Rate Performance
Comparison of different temperature settings and their corresponding hatch rates based on UK poultry research
| Temperature Range (°C) | Temperature Range (°F) | Expected Hatch Rate (%) | Embryonic Mortality Risk |
|---|---|---|---|
| 36.0°C – 37.0°C | 96.8°F – 98.6°F | 40-60 | High (Slow development, many unhatched, weak chicks) |
| 37.5°C – 37.8°C | 99.5°F – 100.0°F | 85-95 | Low (Optimal development) |
| 38.0°C – 38.5°C | 100.4°F – 101.3°F | 50-70 | Moderate (Fast development, potential deformities, sticky chicks) |
| Above 39.0°C | Above 102.2°F | 0-20 | Very High (Embryonic death, ‘cooked’ eggs) |
The data in the table clearly illustrates that moving away from the ideal chicken egg incubation temperature sharply raises the chances of poor hatch rates and the loss of embryos.
One of the most frequent issues for those raising poultry at home is inconsistent temperature control. This can stem from several factors:
- A faulty thermostat not reading temperatures accurately.
- An unreliable incubator that doesn’t hold a steady temperature.
- Placing the incubator in a room prone to temperature swings, such as a conservatory or a drafty shed.
Other common missteps include not letting eggs adjust to room temperature before putting them into a pre-warmed incubator, which can lead to thermal shock. Also, opening the incubator too often can cause significant and harmful temperature drops. Steering clear of these issues by choosing dependable equipment and managing the process carefully is crucial for giving your eggs the best chance, leading to a satisfying hatch of healthy, lively chicks.
Smart Monitoring: Reading Your Eggs Like A Pro
Keeping a steady chicken egg incubation temperature in your incubator is certainly important. However, many poultry keepers in the UK have learned that just watching the incubator’s air temperature display doesn’t tell the whole story. Seasoned hatchers and commercial farms know there’s a more accurate indicator: the eggshell surface temperature (EST). This measurement shows you precisely what your developing chicks are feeling, shifting your approach from guessing to knowing and directly boosting your hatch success.
Why does EST matter so much? As embryos grow, especially after the first week, they start to produce their own metabolic heat. Even if your incubator’s air temperature is set perfectly, the actual temperature of the egg can be quite a bit higher. This is particularly true in incubators where air doesn’t circulate perfectly. By monitoring the EST, you get a direct look at the thermal conditions the embryo is actually facing, which allows for much more precise adjustments to the overall chicken egg incubation temperature.
The practice of directly measuring eggshell temperature is gaining more attention among UK poultry enthusiasts. Both scientific studies and incubator manufacturers now strongly recommend maintaining an eggshell surface temperature between 37.5°C and 38.0°C (99.5°F to 100.4°F) for the best outcomes. Data from UK hatcheries, though not always widely publicized, aligns closely with broader European research, showing that when eggshell temperatures are kept near 37.8°C (100.0°F), hatch rates significantly improve, and so does the quality of the chicks. You can learn more about how shell temperature affects hatchability from European Poultry Science. This deeper understanding is what often makes the difference between consistently great hatches and those that are disappointingly unpredictable.
The Right Tools for Measuring Eggshell Temperature
To measure EST accurately, you’ll need the proper equipment. The most highly recommended tool for this task is a quality infrared (IR) thermometer, sometimes referred to as a spot thermometer. These devices let you take a quick temperature reading directly from the egg’s surface without any contact. If you can, look for one with adjustable emissivity, although most models with a fixed emissivity set for organic surfaces will perform well for eggs.
It’s best to avoid relying only on your incubator’s built-in thermometer for EST. That’s because it measures the air temperature around the eggs, not the temperature of the eggs themselves. Furthermore, inexpensive, uncalibrated stick-on thermometers are generally not precise enough for maintaining the ideal chicken egg incubation temperature at the shell level. Investing in a dependable IR thermometer is a small outlay when you consider the significant improvement in hatch results it can bring.
No matter which device you select, calibration is key. You should always check your IR thermometer against a known, accurate temperature source. This could be an ice bath (which should be 0°C or 32°F) or a calibrated reference thermometer, ensuring its readings are reliable. An inaccurate thermometer can be more misleading than having no thermometer at all, as it might cause you to make incorrect adjustments.
Making Sense of Your Eggshell Temperature Data
Taking readings is quite straightforward. Simply aim the IR thermometer at the equator (the widest part) of several eggs located in different parts of the incubator. This will give you a good average reading. Be sure to do this quickly to minimize the time the incubator lid is open. These readings offer a direct insight into the conditions your embryos are experiencing.
If your EST readings are consistently above 38.0°C (100.4°F), particularly during the second half of the incubation period, your eggs are probably too warm. This can cause development to speed up unnaturally and may reduce hatchability or the quality of the chicks. Conversely, if readings are consistently below 37.5°C (99.5°F), it suggests the eggs are too cool. This can slow down development and potentially lead to late hatches or weaker chicks. Understanding these numbers correctly allows you to fine-tune your incubator’s air temperature setting to achieve the desired EST.
For instance, if your incubator’s air temperature is set to 37.7°C, but your EST readings average 38.5°C, you’ll need to slightly decrease the incubator’s air temperature setting. This careful adjustment ensures the chicken egg incubation temperature that the embryo actually experiences is just right for healthy development.
Factors That Influence Eggshell Temperature
It’s not just the incubator’s thermostat that affects EST; several other environmental conditions also have a considerable impact. Humidity levels, for example, play a role by influencing evaporative cooling from the eggshell. While humidity doesn’t directly heat or cool the egg, very low humidity can lead to too much moisture loss and possibly a slightly cooler EST if the air temperature isn’t adjusted to compensate.
Proper air circulation inside the incubator is extremely important. If airflow is poor, it can create hot spots and cold spots. This means some eggs might be at the perfect EST, while others are dangerously overheated or too chilled, even if the average air temperature seems correct. This is a key reason why choosing an incubator with a good fan is often advised, especially when hatching larger batches of eggs.
Lastly, the placement of the incubator itself, as we touched on earlier regarding general temperature stability, also affects its ability to maintain a consistent internal environment. This, in turn, influences the chicken egg incubation temperature at the shell. A room with drafts or direct sunlight exposure can cause temperature fluctuations that your incubator might struggle to manage, leading to unstable ESTs. Addressing these external elements is vital for truly getting a handle on your incubation environment.
Pre-Incubation Storage: The Foundation Of Success
The path to a great hatch starts long before eggs meet the incubator. While it’s easy to focus on the incubation itself, savvy poultry enthusiasts know that how you store eggs beforehand – specifically the storage temperature – plays a massive role in your success. This initial care is all about keeping the embryo’s vitality intact, preparing it for the critical chicken egg incubation temperature.
Once an egg is laid, cellular activity doesn’t just stop; it simply slows down. The storage temperature directly controls how much it slows. Depending on how long you plan to store the eggs, you’ll need different temperature approaches. The main goal is to stop the embryo from developing too early, unevenly, or losing its quality.
Why Storage Temperature Matters Before Incubation
The conditions eggs experience before they hit the controlled chicken egg incubation temperature of your machine are incredibly important. If storage temperatures aren’t right, they can cause unseen harm to the blastoderm, which is the tiny beginning of the embryo. Storing eggs too warm for an extended period can kickstart development in a slow, haphazard way, often resulting in early death when proper incubation begins. On the other hand, very cold temperatures can also reduce the chances of a successful hatch.
Proper storage aims to put the embryo into a state of ‘suspended animation,’ known as physiological zero. This is a specific temperature point where cell division basically stops, but the embryo stays alive and ready for strong development once it’s moved to the ideal chicken egg incubation temperature. Guidelines in the UK acknowledge this, suggesting different storage temperatures based on the planned storage duration.
Optimal Storage Temperatures and Durations
In the UK, storing eggs before incubation is handled with care, because both the temperature and how long you store them greatly impact how many chicks will hatch. If you’re storing eggs for less than 4 days, a temperature of 20–22°C is recommended. This slightly warmer temperature helps the eggs warm up smoothly and uniformly when you move them to the incubator. For eggs stored between 4–7 days, you’ll want to lower the temperature to 16–18°C. If storage goes beyond 7 days, a cooler range of 13–15°C is best to keep the embryos viable. You can delve deeper into this subject on poultry management resources. These precise temperatures are set to reduce early embryo development while protecting the egg’s future.
To help you manage your eggs effectively, here’s a breakdown of recommended storage temperatures and practices based on how long you plan to keep them before setting. Adhering to these guidelines for UK poultry is crucial for preserving embryo viability.
Egg Storage Temperature Guidelines by Duration
Recommended storage temperatures for different timeframes based on UK poultry best practices
| Storage Duration | Temperature (°C) | Temperature (°F) | Daily Hatchability Decline (%) | Best Practices |
|---|---|---|---|---|
| Up to 4 days | 20–22°C | 68-72°F | Minimal if conditions are ideal | Maintain high humidity (around 75%); turn eggs if storing near the 4-day limit. |
| 4–7 days | 16–18°C | 61-64°F | Gradual decline begins | Maintain high humidity; turn eggs daily to prevent sticking. |
| Longer than 7 days | 13–15°C | 55-59°F | More significant decline | Maintain high humidity; turn eggs daily; allow gradual warming before setting in incubator. |
| Beyond 10-14 days | Below 15°C | Below 59°F | Substantial decline daily | Use only if unavoidable; expect lower hatch rates; consider periodic warming protocols. |
As the table shows, cooler temperatures are necessary for longer storage periods to minimize developmental issues. Always aim for the shortest storage time possible for the best hatch rates.
While getting storage right is foundational, the image below, ‘Hatch Rate vs Temperature,’ vividly shows how actual chicken egg incubation temperature settings impact success. It compares outcomes at 35°C, 37.5°C, and 39°C.
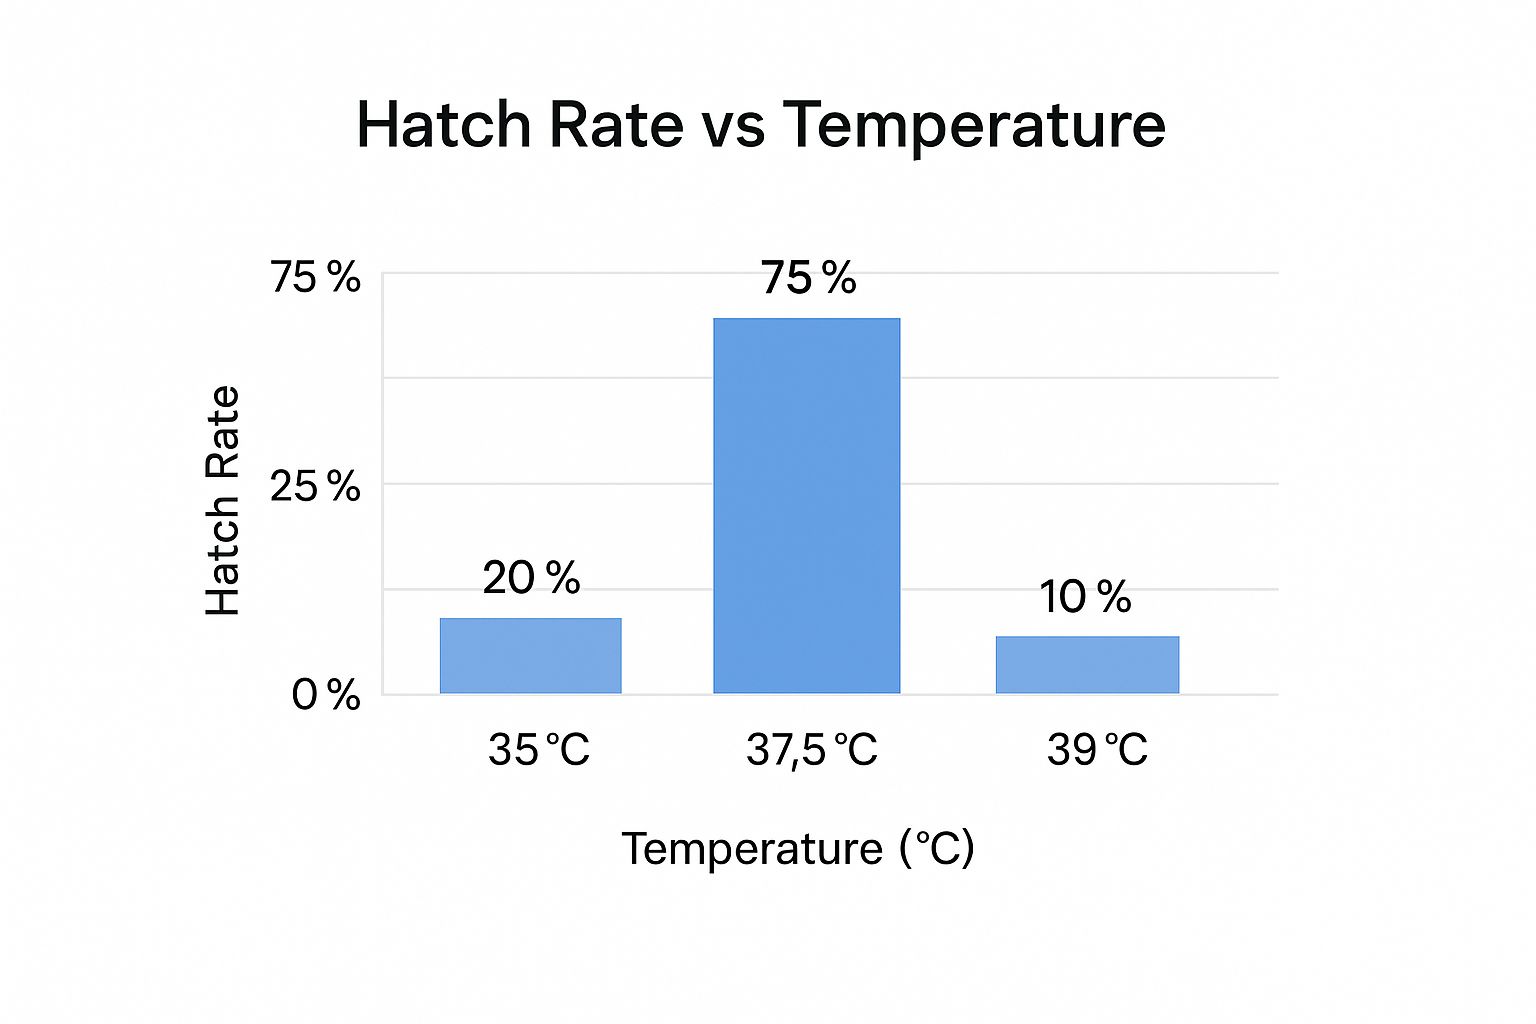
The figures are quite telling: a 75% hatch rate at 37.5°C drops sharply to only 20% at 35°C, and down to just 10% at 39°C. This highlights just how critical the correct chicken egg incubation temperature is once those eggs are in the incubator.
Practical Storage Protocols for UK Producers
Consistently hitting these storage temperatures takes some thought. Many UK small-scale producers find that a cool, dark space like a pantry or cellar, shielded from direct sun and breezes, works well for short-term storage. Regularly checking the temperature with a reliable thermometer is key.
Here are some important tips:
- Always store eggs with the pointed end down. This helps keep the yolk centered and the air cell stable.
- If you’re storing eggs for more than a couple of days, turn them daily. A gentle 45-degree tilt in one direction, then the other, stops the yolk from adhering to the shell.
- Make sure the storage area has good air circulation and is free from strong smells, as eggs can absorb odors.
Following these practices helps ensure your eggs are in top condition when they’re ready for the specific chicken egg incubation temperature.
Equipment Solutions for Different Scales
If you’re a hobbyist hatching small batches now and then, a simple cool spot can do the trick. Think an unused shelf in a pantry or even a wine cooler adjusted to the correct temperature. Consistency in temperature is more vital than fancy equipment.
For more serious breeders or those dealing with a larger volume of eggs, dedicated egg storage cabinets are a worthwhile investment. Alternatively, a small refrigerator modified with an external thermostat can offer dependable temperature and humidity management. These setups are better at keeping within the precise temperature ranges needed, particularly for extended storage, safeguarding your potential hatch.
The Economic Impact of Smart Storage
Mastering pre-incubation storage isn’t just about following best practices; it’s also a smart financial move. Each egg that doesn’t hatch because of incorrect storage represents a loss, whether you aimed to grow your flock, sell chicks, or gather eggs for consumption. By maintaining optimal storage temperatures, you get the most out of your fertile eggs.
Putting good storage strategies in place leads directly to better hatch rates. This translates to more vigorous chicks from every set of eggs, cutting down on waste and boosting the efficiency of your hatching efforts. This attention to detail, even before you think about the final chicken egg incubation temperature, offers significant returns over time.
Choosing Your Temperature Control System Wisely
Once your eggs are properly stored and awaiting incubation, your next major step towards a successful hatch involves picking a suitable incubator. Not every incubator is made alike, and the capacity of your selected unit to hold a steady chicken egg incubation temperature can mean success or failure. For this reason, knowing what to look for in temperature regulation is key.
Seasoned poultry enthusiasts throughout the UK often point out that essential performance outweighs impressive-looking features. When you’re looking at different incubators, the three cornerstones of good temperature management are accuracy, stability, and reliability. These factors guarantee that your growing embryos get the steady warmth they need for proper growth, which directly affects the consistency of the chicken egg incubation temperature. Prioritizing these basic functions will guide you to a wiser purchase.
Key Features for Consistent Results
Some features are absolutely vital for keeping a steady chicken egg incubation temperature. Seek out incubators equipped with high-quality, responsive thermostats and efficient air circulation systems, which usually include a fan. Strong insulation and durable construction also significantly help in reducing temperature variations by preventing unnecessary heat escape or entry.
The accuracy of an incubator’s thermostat is critically important; setting a temperature is pointless if the machine doesn’t reach it. Likewise, stability refers to the incubator’s capacity to consistently maintain the desired chicken egg incubation temperature, avoiding major highs and lows that can harm or even prove fatal to the developing embryos. Your main objective is to achieve this steady environment.
The effect of a good quality system on your hatching results is truly significant. Indeed, figures indicate that professional incubator systems offering precise temperature control can reach 85-95% hatch rates. In contrast, simpler models with inadequate temperature management frequently find it difficult to get more than a 60% success rate, making your choice of equipment a crucial element for hatching success. You can learn more about the statistical differences by exploring this topic further. This clearly shows why making a careful investment in your incubation equipment is so vital for controlling the chicken egg incubation temperature.
Practical Steps for Optimal Performance
Aside from the incubator’s own features, the way you operate and care for it greatly influences its capacity to regulate the chicken egg incubation temperature. Correct placement should be your initial thought. Place your incubator in a room where the surrounding temperature is constant, far from direct sunlight, drafts, or heat sources such as radiators. A stable outside environment helps the incubator keep its internal conditions consistent.
Following that, routine calibration isn’t merely a recommendation; it’s a must-do for anyone serious about hatching. Avoid depending only on the incubator’s built-in display. Instead, regularly compare its thermometer reading with that of a calibrated, separate thermometer. This straightforward action confirms that the chicken egg incubation temperature you believe you’re setting is the actual temperature your eggs are receiving, helping to avoid many frequent hatching issues.
Regular upkeep is also essential for the long life and dependability of your temperature control system. This involves several key actions:
- Cleaning and disinfecting the incubator thoroughly after every hatch to stop any disease accumulation.
- Making sure fans are free from obstructions and that heating components are working as they should.
- Verifying that door or lid seals are tight to stop heat from escaping, which could affect the chicken egg incubation temperature.
Performing these easy tasks can head off expensive malfunctions and keep your equipment prepared.
Preparing for the Unexpected
Even top-tier equipment can face problems, and power outages are a regrettable fact of life for many, especially in more remote areas of the UK. Because of this, having a backup strategy to safeguard your valuable eggs isn’t just sensible, it’s crucial. When the perfect chicken egg incubation temperature is at risk, a solid plan B can be the difference in saving your hatch.
Think about these approaches to protect your growing chicks:
- An uninterruptible power supply (UPS) can offer temporary power during short power interruptions.
- A backup generator proves extremely useful for extended power failures, helping to keep your chicken egg incubation temperature steady.
- If you’re caught out, well-insulated incubators can hold their heat for some time; placing blankets over them (while making sure ventilation isn’t obstructed) can assist.
Anticipating these situations can give you reassurance and secure your investment of time and precious eggs.
Advanced Temperature Strategies Through The 21-Day Cycle
Maintaining a steady chicken egg incubation temperature is a good starting point, but many poultry raisers discover that a more adaptable method can produce better outcomes. Adjusting the temperature throughout the 21-day cycle, rather than keeping it fixed, can meet the embryo’s evolving needs. This may lead to improved hatch rates and healthier chicks.
This approach considers that an egg is a living entity experiencing significant development. The embryo’s needs and its own heat output shift as it matures. This means a flexible chicken egg incubation temperature can be quite helpful, and seasoned hatchery operators often make slight changes based on various conditions.
Tailoring Temperature to Embryonic Needs
An embryo’s metabolism isn’t steady during incubation. Early on, the tiny embryo depends completely on the incubator’s warmth for initial growth and development. But as it gets bigger, especially after the halfway point of incubation, the embryo starts producing a considerable amount of its own heat.
If this internal heat isn’t considered, eggs can get too hot, even if the incubator’s air temperature stays the same. Temperature management plans that adapt to different incubation phases have shown a 15-20% improvement in hatch rates over fixed temperature methods. The first week of development sees especially good results from this. Explore the benefits of dynamic incubation further. This knowledge helps in refining temperature control.
The Practice of Temperature Stepping
One advanced method is known as temperature stepping. This means intentionally changing the incubator’s set chicken egg incubation temperature at certain times during the 21-day cycle. While not everyone in poultry circles agrees it’s always needed, many find it works well, especially with large numbers of eggs or for particular breeds.
The main purpose of temperature stepping is usually to lower the incubator temperature a bit in the final stages of incubation, generally starting around day 18. This decrease, typically 0.5°C to 1.0°C (1°F to 2°F), helps balance the extra metabolic heat from the nearly developed chicks. The aim is to keep the optimal internal egg temperature, not just the air temperature around them.
Proper execution is important:
- Slow Adjustments: Make any changes gradually so the embryos aren’t stressed.
- Accurate Checks: Using good thermometers and regularly checking eggshell temperatures (as mentioned before) is even more crucial.
- Detailed Notes: Keep records of your changes and the results to improve your approach for next time.
Adapting to Breeds, Seasons, and Egg Variables
Beyond the embryo’s growth phases, several other elements can affect the best chicken egg incubation temperature settings:
- Breed Differences: Certain breeds, especially larger or more sensitive types, may do better with specific temperature plans. Looking up advice for your particular breed from trusted sources like HatchingEggs.eu can be very helpful.
- Changes with Seasons: The temperature of the room where your incubator is located can impact its internal conditions. In colder months, you’ll want to make sure your incubator isn’t overworking; during warmer periods, avoiding overheating is more of a focus.
- Egg Characteristics (Size and Quantity): Bigger eggs, or an incubator packed with many eggs, will produce more combined metabolic heat. This might mean you need to lower the temperature sooner or by a larger amount late in incubation compared to smaller eggs or fewer eggs.
Putting these more developed methods into practice successfully calls for careful attention, sharp observation, and dependable gear. For those keen on getting the highest possible hatch rates, adjusting the chicken egg incubation temperature during the cycle can lead to satisfying results.
Troubleshooting When Things Go Wrong
Even with careful planning, incubating chicken eggs can hit snags, especially when it comes to maintaining the correct chicken egg incubation temperature. When problems pop up, knowing how to act quickly and correctly can mean the difference between a failed hatch and saving your developing chicks. Poultry keepers in the UK with experience learn to spot early trouble signs and have methods for fixing issues.
Spotting the Red Flags: Early Warning Systems
The first part of fixing problems is watching closely. Are your eggs growing as they should? Candling at day 7 and day 14, a common practice for UK poultry enthusiasts, shows if development is on schedule, too slow (which might mean a low chicken egg incubation temperature), or too fast (pointing to high temperatures). Other clues include:
- Strange condensation patterns inside the incubator.
- Temperature readings on your incubator or separate thermometers that jump around.
- Chicks that break the shell (pip) but don’t hatch, or hatch late and seem weak, often signal issues with temperature consistency.
If you see these signs, it’s time to look closer at your chicken egg incubation temperature settings and how stable they are. It’s important to figure out if the issue is only with the chicken egg incubation temperature, or if other things like wrong humidity levels or turning problems are also involved. For instance, chicks that seem sticky might point to high humidity near the end, not a temperature problem throughout the whole period. Being alert like this helps you catch small issues before they become big hatch disasters.
Diagnosing and Fixing Temperature Troubles
When you think there’s a temperature problem, it’s best to be methodical. First, check your incubator’s thermometer reading against a calibrated, separate thermometer placed at the same level as the eggs. This will show if the incubator’s thermostat is off or if the actual internal conditions aren’t what you aimed for. If there’s a difference, your main job is to get the chicken egg incubation temperature stable.
Sometimes, the problem isn’t the incubator itself but what’s happening outside. For example, a sudden cold spell in the UK could make your incubator work harder to stay warm, especially if it’s in a less insulated spot like a shed. On the other hand, a heatwave could make it overheat. Dealing with these outside influences is often the first practical thing to do.
Emergency Steps for Temperature Swings
Sudden rises or falls in temperature need your immediate attention. If temperatures shoot up, opening the incubator lid for just a minute or two can help let out extra heat, but be careful not to cool the eggs down too much. Make sure any ventilation holes aren’t blocked. If temperatures drop sharply, perhaps due to a power cut, you can cover the incubator with blankets (still allowing some air flow) to help keep the warmth in.
How fast you react is very important. In fact, a quick response to temperature deviations within the first 2 hours can recover up to 80% of potential hatch losses. Delays beyond 6 hours usually cause lasting harm to the growing embryos. You can discover more insights about emergency temperature responses. This really shows why checking the chicken egg incubation temperature so regularly is vital.
Making Sure Your Equipment Is Accurate: Calibration Checks
A common reason for temperature troubles is a thermometer that’s not calibrated or isn’t working right. If your hatches are consistently poor even when the chicken egg incubation temperature settings seem correct, it’s time to re-calibrate all your thermometers. For digital thermometers, you can check their accuracy against a thermometer you know is correct, or by using an ice-water bath (which should read 0°C). A thermometer that’s off gives you false assurance and can lead to making the wrong adjustments.
Keeping careful records of your temperature settings, actual readings from independent thermometers, any adjustments you make, candling observations, and the final hatch results can be extremely helpful. Over time, these records allow you to see patterns in your chicken egg incubation temperature management, find recurring problems with certain equipment, or even notice if particular batches of eggs react differently. This lets you fine-tune your methods for better results in future hatches. Sometimes, even with your best efforts, issues continue, and knowing when to ask more experienced breeders or equipment specialists in the UK for help can prevent a lot of frustration and lead to better outcomes.
Understanding the details of chicken egg incubation temperature and how to effectively fix problems is central to successful hatching. For high-quality hatching eggs from a variety of breeds, supported by expertise and a dedication to viability, take a look at the excellent selection at HatchingEggs.eu and begin your next hatch with assurance.
Article created using Outrank