


Why Your Own Incubator Beats Store-Bought Every Time
Let’s talk incubators. Those fancy, expensive ones at the farm supply store? They often disappoint. I’ve talked to so many poultry keepers, and the ones with the best hatch rates? They built their own. Why? They understand every single piece of their incubator. They’ve tweaked and adjusted it for perfect hatching. You can do this too!
Building your own isn’t just about saving money (though a homemade incubator can cost a third of the price of a store-bought one). It’s about creating a system you trust. One you built for reliable performance, season after season. A £400 plastic box with fancy buttons just can’t offer that. Want some help getting started? Check out our guide on how to incubate chicken eggs at home.
Think of it like this: would you rather drive a car you built yourself, or one straight off the assembly line? Same with incubators. When you build it, you know it.
Plus, as the UK egg market grows, so does the need for dependable incubation. The UK egg market is expected to grow from $2.62 billion in 2025 to even more by 2030, with a 9.7% annual growth rate. That shows how important good incubation is for bigger and more varied flocks. Learn more about the UK egg market’s growth.
I’ve heard stories from breeders who switched to homemade incubators and never looked back. They talk about having real control, being able to fix any problem fast because they understand their system. One breeder told me about a late-night humidity spike. It would have ruined her hatch in a commercial incubator. But she built hers, so she knew exactly what went wrong and fixed it in minutes.
That’s the power of DIY. It’s not just hatching eggs. It’s understanding the whole process. You can react quickly and effectively to anything, giving your eggs the best chance. This control can mean the difference between an okay hatch and a fantastic one.
Smart Shopping: Components That Make Or Break Your Build

This infographic shows a sample materials list laid out, giving you a good visual starting point. Trust me, getting organized like this beforehand makes the whole build process so much smoother. No more scrambling for parts mid-build!
Let’s talk components. Forget those massive, overwhelming parts lists you see online; we’re focusing on the essentials, the stuff that really makes a difference. I’ve learned this through lots of trial and error, and even more conversations with fellow UK builders. We’ve shared our successes and, let’s be honest, our epic fails.
Heating Elements: Consistency Is King
The heating element is the core of your incubator. Uneven heat equals uneven hatching. Simple as that. A 25-watt bulb can work, but I’ve found them a bit finicky. A friend learned this the hard way – a bulb blew mid-incubation, and he lost a whole batch of ducklings. He’s since switched to flexible silicone heating pads for better heat distribution and hasn’t looked back. His hatch rates skyrocketed! They do cost a bit more, but the peace of mind is worth the extra few quid.
Thermostats: Where Precision Pays Off
A reliable thermostat is crucial. I’ve witnessed firsthand the chaos a cheap, fluctuating thermostat can create. One minute your incubator’s a sauna, the next it’s an icebox. Invest in a digital thermostat with a built-in alarm. That alarm is a lifesaver; it’s alerted me to temperature drops several times and saved my hatches. Loads of great options are available from UK suppliers online.
Turning Mechanisms: Gentle and Reliable
Regular egg turning is essential for proper chick development. Sure, you could turn them manually, but let’s be real – life gets busy. Forgetting just once can impact your hatch. An automatic turner is a game-changer. You can buy them, but I know several UK builders who’ve successfully built their own using a small motor and a timer. It’s cheaper and allows customization, but it requires some DIY skills. If you’re not comfortable tinkering, a commercial turner might be better.
Sourcing Smartly: UK Suppliers and Local Finds
Finding decent parts in the UK isn’t as difficult as you might think. I’ve had good experiences with online retailers like B&Q and Screwfix for basic components. For specialized incubator bits, a quick online search will point you towards some reliable UK suppliers. Also, don’t underestimate local farm supply stores—they can be goldmines! One friend even repurposed a thermostat from an old reptile tank, saving a good chunk of money.
Before diving into your shopping list, here’s a handy comparison of some key components:
Essential Incubator Components Comparison: Real-world comparison of heating elements, thermostats, and turning mechanisms with honest cost analysis and reliability ratings based on builder experiences
| Component | Type | Cost Range (£) | Reliability | Best For |
|---|---|---|---|---|
| Heating Element | 25-watt Bulb | 2-5 | Low | Budget-conscious beginners |
| Flexible Silicone Heating Pad | 10-25 | High | Consistent, reliable heating | |
| Thermostat | Basic Analog | 5-10 | Moderate | Simple setups |
| Digital with Alarm | 15-30 | High | Worry-free incubation | |
| Turning Mechanism | Manual | 0 | Moderate | Dedicated hobbyists |
| Automatic (Commercial) | 20-40 | High | Convenience | |
| DIY (Motor & Timer) | 5-15 | Moderate | Customizable, budget-friendly |
This table highlights the trade-offs between cost and reliability for different incubator components, helping you make informed choices for your build.
Balancing Your Budget: Where to Splurge and Where to Save
Building an incubator doesn’t have to cost a fortune. You can definitely save by using readily available materials like plywood or insulation foam. But please, don’t compromise on the thermostat and heating element – these are your investment pieces. They’re vital for consistent performance and successful hatches. A few extra pounds now can save a lot of heartache (and lost chicks) later. Think long-term reliability! Building your own incubator is about control—control over the hatching process, from component choices to final calibration. By understanding each component’s role, you’re building a system tailored to your needs and your birds.
Building Housing That Keeps Eggs Happy For Weeks
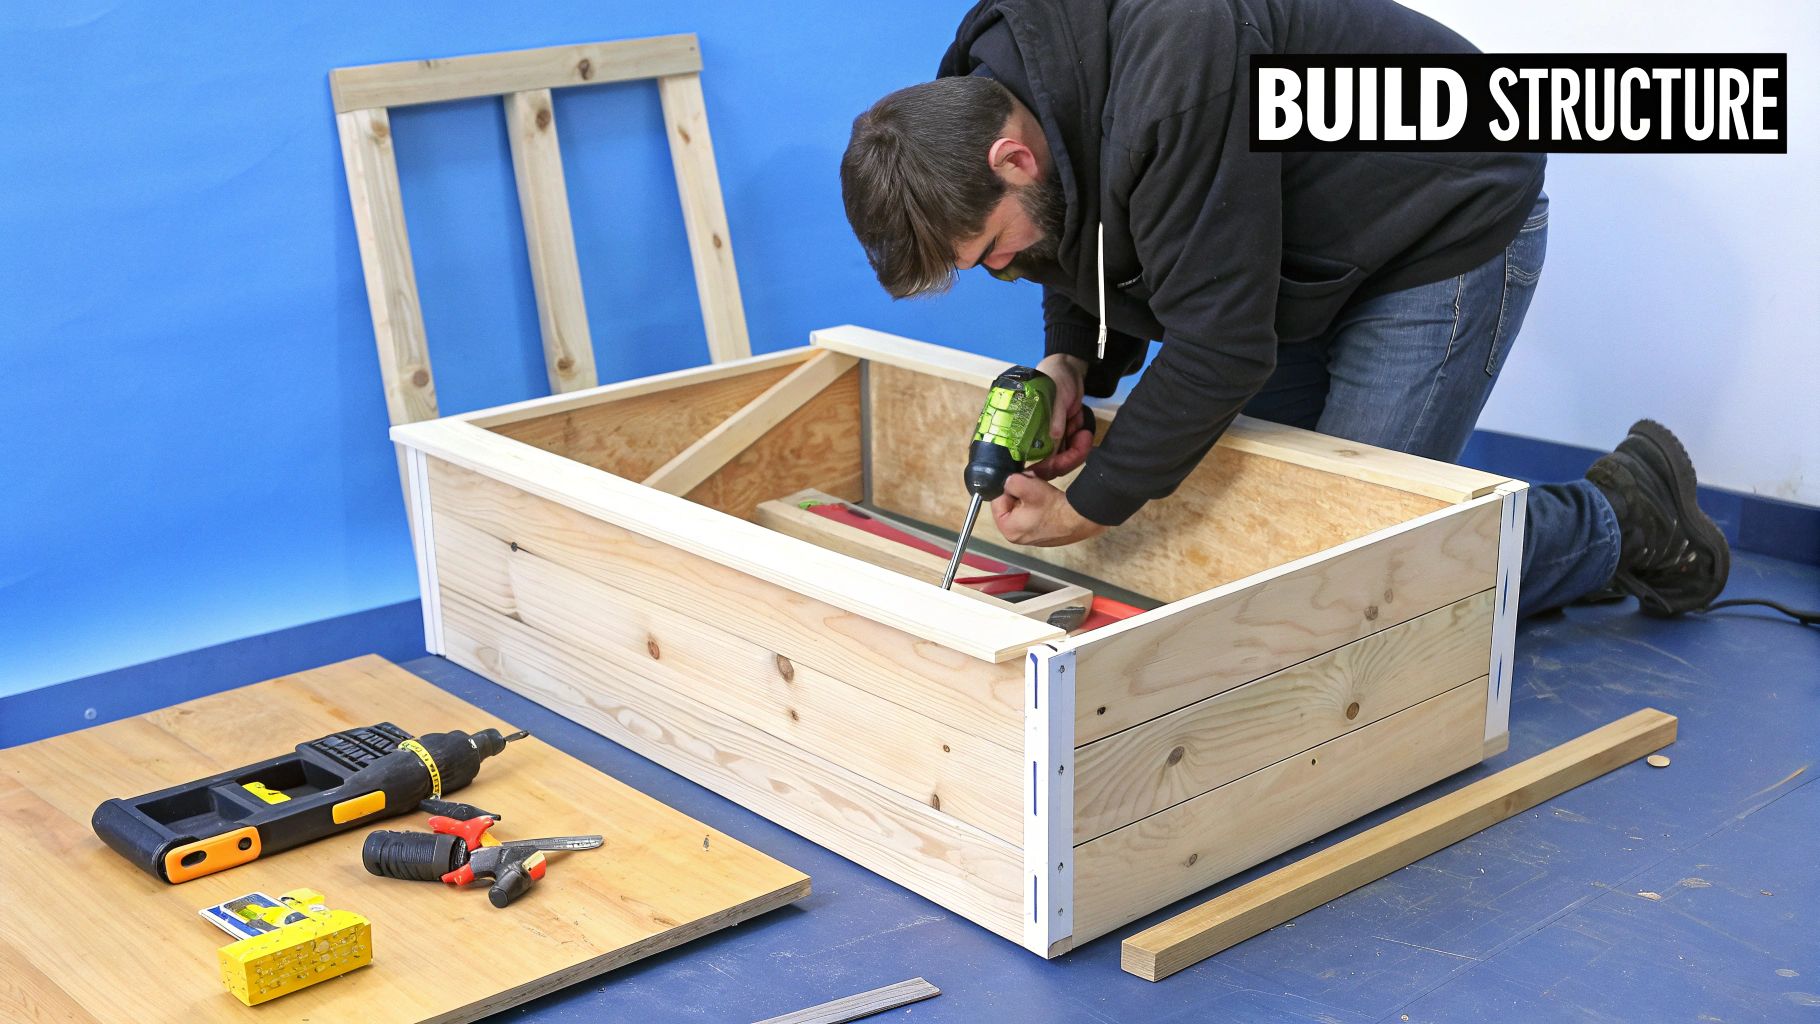
This image shows a simple but effective incubator housing design. Check out that viewing window – it’s perfect for peeking at your eggs without messing with the temperature inside. Getting the housing right is the most important part of a good DIY incubator. Honestly, it’s where a lot of folks go wrong, leading to uneven temperatures and disappointing hatches. This section is all about avoiding those pitfalls. We’ll cover how to create an enclosure that keeps those precious eggs at a steady temp without needing constant babysitting.
Choosing the Right Materials: From Coolers to Custom Creations
You don’t need anything fancy to build a great incubator. I’ve seen everything from old coolers to custom-built wooden boxes transformed into reliable hatching havens. An old polystyrene cooler is fantastic because it offers superb insulation, which is key for maintaining those stable temperatures, especially in colder climates. If you’re handy with a saw, a plywood box lined with insulation foam also works like a charm. A friend of mine actually converted an old refrigerator! He added some ventilation and a heating element, and the thing worked perfectly for years. The takeaway? Focus on materials that insulate well and can maintain a consistent internal environment.
Insulation: Your Eggs’ Best Friend
Good insulation is vital. If you don’t have enough, your incubator will struggle to hold a steady temperature. Too much, and you risk overheating. Think of it like a thermos – it keeps your coffee hot by preventing heat loss. Your incubator needs to do the same for your eggs. Rigid insulation board or thick polystyrene sheets are excellent choices. Remember, consistency is key for a successful hatch.
Ventilation: Finding the Sweet Spot
Ventilation is important for providing fresh air to those growing embryos. However, too much airflow creates drafts and temperature swings. Small vents placed near the top and bottom of your incubator work best. This allows for gentle air circulation without causing drastic temperature changes. I know one breeder who uses adjustable vents. He tweaks the airflow based on the weather and the incubation stage, which gives him a lot of control.
Viewing Windows: A Peek Inside
A viewing window lets you check on your eggs without opening the incubator and disturbing the environment. Clear acrylic or Perspex works well. Make sure it’s well-sealed to prevent drafts. I use silicone sealant to ensure a tight seal around the window. This helps maintain the temperature and humidity inside, preventing any fluctuations.
Addressing Common Housing Problems: Heat Stratification and Humidity Dead Zones
Two common problems with DIY incubators are heat stratification (uneven temperatures at different levels) and humidity dead zones (areas with varying humidity). A small fan can circulate the air and prevent heat stratification. For humidity, a shallow dish of water placed near the heating element works well. I’ve found that a digital hygrometer is invaluable for monitoring humidity levels. It lets you catch those subtle changes and make adjustments before they become big problems. By addressing these potential issues while you’re building, you’ll be well on your way to creating a thriving environment for your eggs. Building an incubator isn’t just about putting parts together; it’s about understanding what your developing chicks need and creating the perfect space for them to grow.
Mastering Temperature and Humidity Like a Pro
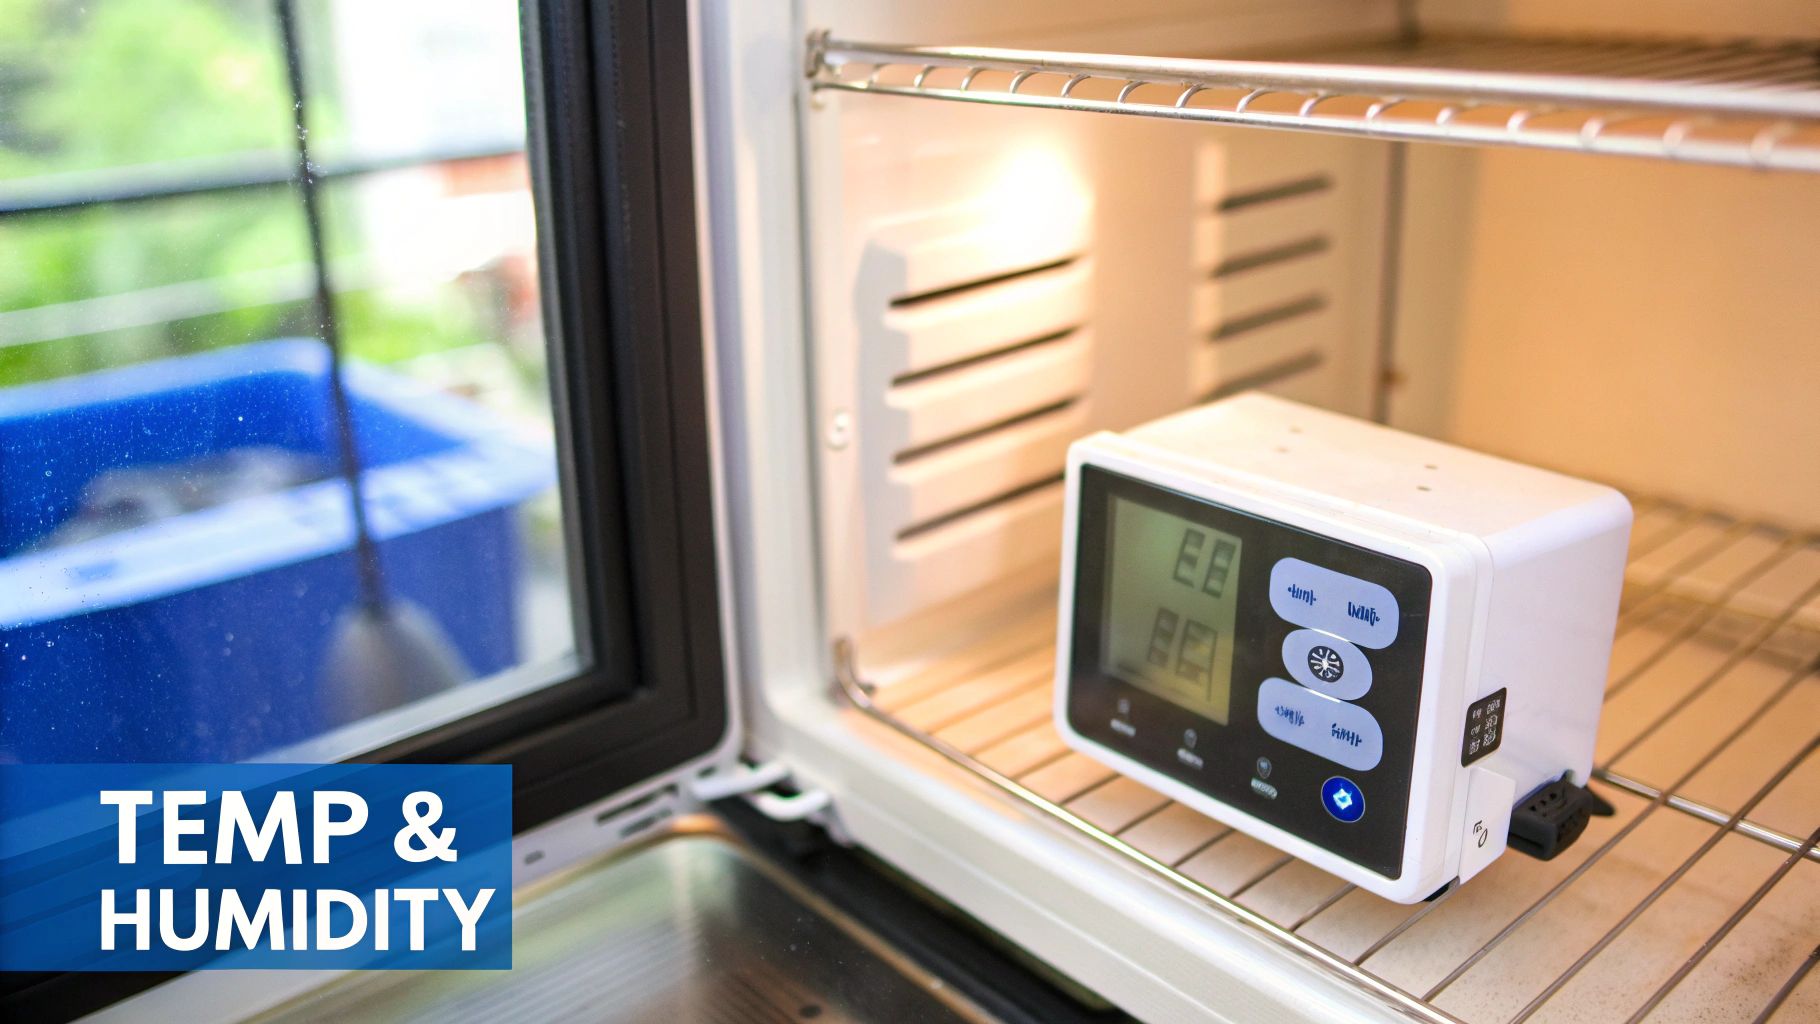
This image shows the sweet spot inside a happy incubator. See that gentle condensation? That’s your humidity working its magic. Maintaining this balance is key, and it’s where your DIY incubator can really outperform store-bought ones. Getting the temperature and humidity dialed in is the difference between hatching success and failure. Trust me, I’ve been there. This section shares proven techniques from experienced builders who consistently get amazing hatch rates.
Positioning for Success: Eliminating Hot and Cold Spots
Think of your incubator as its own little world. You wouldn’t want your future chicks huddled in one corner, too hot or too cold. Even heat distribution is absolutely vital. My first incubator was a disaster – the eggs nearest the heat source basically fried, while the others were left out in the cold (literally). A small fan is a game-changer. It circulates the air and gets rid of those hot and cold spots. Where you place your heating element matters too. Try positioning it slightly off-center to encourage airflow and create a more even temperature.
Humidity Control: The Unsung Hero of Hatching
Humidity is just as important as temperature, but often gets forgotten. It’s the moisture that keeps the developing embryos from drying out. Too little, and the chicks can’t break free. Too much, and they might drown in their shells. A simple water pan under the heating element works well. The heat helps the water evaporate, increasing the humidity. Here’s a tip: use several small water pans instead of one big one. This gives you more surface area for evaporation and more consistent humidity. For a real-world example of how vital humidity is, check out this info on duck egg incubation temperatures.
Monitoring Without Obsessing: Trust But Verify
You don’t need to babysit your incubator 24/7. Get yourself a decent digital thermometer and hygrometer with a built-in alarm. Think of them as your early warning system, letting you know if anything goes off track. This gives you peace of mind. Spot checks are still a good idea, though. Keep an eye on things and note any subtle shifts in humidity or temperature. This way, you can catch potential problems early and fix them before they become major issues.
Speaking of adjustments, tailoring an incubator to a specific market like the UK is crucial. The British Egg Industry Council projected the UK’s laying flock would reach 40 million birds by January 2025, with a focus on free-range and organic methods. This shows how important flexible incubation tech is. Learn more about the changing UK egg industry.
Calibration: Your Secret Weapon for Consistent Success
Calibration is essential. I’ve seen perfectly good incubators fail just because the instruments weren’t reading accurately. A thermometer that’s off by even a degree or two can significantly impact your hatch rate. Before you add any eggs, run a test cycle. Let your incubator run for 24 hours and carefully monitor the temperature and humidity. This helps you spot any fluctuations and calibrate your instruments. Keep a log of your readings–it’s like a personal history for your incubator, and a great reference for future adjustments. Mastering temperature and humidity isn’t luck; it’s about understanding the science, having good tools, and paying attention. With these skills, you’ll be hatching chicks like a pro.
The table below provides a quick reference guide for different poultry species. These settings are based on data from experienced incubator builders and have consistently resulted in successful hatches.
Optimal Incubation Settings By Species
| Species | Temperature (°C) | Humidity (%) | Incubation Days | Special Notes |
|---|---|---|---|---|
| Chicken | 37.5 | 45-55 (increasing to 65-70 during hatch) | 21 | Regularly turn eggs until day 18 |
| Duck | 37.5 | 55-65 (increasing to 75-80 during hatch) | 28 | Requires more humidity than chickens |
| Goose | 37.5 | 50-60 (increasing to 70-75 during hatch) | 30 | Longer incubation period |
| Quail | 37.5 | 50-60 (increasing to 70 during hatch) | 17-18 | Shortest incubation period |
| Turkey | 37.5 | 50-60 (increasing to 65-70 during hatch) | 28 | Similar incubation to ducks |
Remember these settings are a starting point. You may need to make slight adjustments depending on your specific incubator and environment. Keep a close eye on your humidity and temperature readings and adjust as needed.
Egg Turning Solutions That Never Let You Down
That video shows a neat little DIY automatic egg turner. See how gently it rotates those eggs? That’s the magic ingredient to avoid any damage. Picking the right turning method is a big deal when you’re building an incubator. It can really make or break your hatch rate. Let me share some practical solutions I’ve picked up from other successful UK hatchers, from simple manual turning to some clever automated systems you can build at home.
Manual Turning: Simple, But Requires Dedication
Manual turning is the most basic way to go. It’s free, which is nice, but it takes real commitment. You need to turn your eggs at least three times a day, spread out evenly. Mark each egg with a pencil so you know which way is up (literally!). This is where things can get tricky. Life happens, and it’s easy to miss a turn. Even skipping one can affect your hatch. A friend of mine once forgot to turn his eggs for a whole day – he was dealing with a sick sheep. The hatch rate was definitely lower, and some of the chicks didn’t develop properly.
Automated Turners: The Hands-Off Approach
Automated turners are a real time-saver and keep everything consistent. You can buy ready-made automatic egg incubators, of course. But building your own is super satisfying and usually cheaper. A simple system using a small geared motor and a timer does the trick. A lot of people use a rotisserie motor (the kind you’d use for a chicken). They’re easy to find and provide a nice, gentle rotation. You can even add a micro-switch to stop the motor at each end of the rotation, so the eggs don’t roll too much.
Building Your Own Automatic Turner: A Rewarding Challenge
Making your own turner is easier than it sounds. Loads of UK builders, myself included, swear by this. Picture this: a system you built that gently rocks your eggs back and forth, just like a hen would do. You can find plans and tutorials all over the internet, and tweak them to fit your incubator size and how many eggs you have. Here’s a pro-tip: use smooth dowels or rods for the egg cradles. This stops the eggs from sticking and makes sure they turn smoothly. You might find this link helpful: automatic egg incubators.
Choosing the Right Turning Method: Practical Advice
The best method really depends on your life and what you’re aiming for. If you’ve got a small setup and don’t mind putting in the time, manual turning is fine. But for larger batches, or if you’re busy, an automated system is a lifesaver. Building your own saves money and lets you customize everything. Plus, there’s that awesome feeling of making something useful from scratch. Another thought: build a backup system. A simple manual setup can save the day if your automatic one goes down. Peace of mind is worth everything when you’re waiting for those chicks to hatch. Whatever you choose, consistent, gentle turning is key for healthy chicks. These solutions make that process easier and more reliable. Think about what works best for your setup, your budget, and most importantly, your future chicks.
Calibration Secrets For Consistently Great Hatches
A well-built incubator is only as good as its calibration. This is where the little things really make a difference. Before you even think about adding eggs, you need to understand exactly how your incubator performs. It’s like a new oven – you wouldn’t bake a cake without testing it first, right?
Running Meaningful Test Cycles
Experienced incubator builders will tell you: systematic testing is key. This isn’t just plugging it in and seeing if it warms up. It’s about finding any hidden issues before they affect your hatch. Run your incubator for at least 24 hours without eggs, carefully watching the temperature and humidity. Imagine a cold spot lurking in a corner, chilling a few eggs. You’d rather find that now, not days into incubation.
For example, I built an incubator once that seemed perfect at first. After a full day, though, the temperature swung by a couple of degrees. Turned out the thermostat was faulty. A quick part swap saved the day (and a potential disaster). This is also a prime opportunity to test your turning mechanism. Make sure it’s rotating smoothly and gently, not jerking around and potentially harming the eggs.
Also, play around with the humidity. Try adding different amounts of water to your humidity pan and observe how the incubator reacts. This will teach you how quickly the humidity changes and how stable it remains. You might find this helpful: Incubation Humidity.
Creating Calibration Records: Your Incubator’s Personal History
Keep a detailed log of your test results. Think of it as your incubator’s personal diary. Note down temperature fluctuations, humidity changes, and any tweaks you make. This logbook becomes invaluable for troubleshooting later on. For instance, if you consistently notice a slight temperature drop at night, you’ll know precisely how much to adjust the heater.
Speaking of adjustments, did you know about the changes in the UK’s egg production? The UK has moved significantly towards free-range systems. Free-range eggs now make up 67% of production. This shift impacts incubator design and highlights the increasing focus on hen welfare. Learn more about these UK egg industry changes.
Developing Observation Skills: The Art of the Hatch
Calibration isn’t just about numbers; it’s about getting a feel for your incubator. Learn to spot the subtle cues that something isn’t quite right. Is there excessive condensation? Are the vents functioning correctly? This observational skill is what separates seasoned hatchers from those just starting out.
Don’t strive for absolute perfection. Some fluctuation is normal. The real goal is understanding your incubator’s usual behavior, so you can spot anything truly out of the ordinary. Often, minor adjustments are all it takes to correct small issues. But knowing when and how to make those adjustments comes from careful observation and those essential calibration records.
Troubleshooting Problems Before They Ruin Everything
Building your own incubator is rewarding, but let’s be honest, things don’t always go as planned. From wacky temperature swings to humidity hiccups, there are a few common bumps you might encounter along the way. Trust me, I’ve learned these lessons the hard way, and I’m happy to share some tips to help you avoid a hatching heartbreak.
Temperature Swings: The Incubator Rollercoaster
Temperature is key, and unexpected fluctuations can be a real pain. A faulty thermostat is often the culprit. I once had one go haywire and start overheating the incubator overnight – luckily, my alarm saved the day (and the eggs!). A quick replacement did the trick.
If your thermostat seems fine, check your heating element. A flickering bulb or a failing heating pad can cause uneven heat. Also, consider the room itself. Is the incubator near a drafty window or vent? Even a small draft can make a big difference. Moving your incubator to a more stable spot can work wonders.
Humidity Spikes and Dips: The Humidity Jungle
Humidity is another tricky beast. Sudden changes can really mess with the hatching process. One common issue is the water pan. Too big, and humidity spikes; too small, and it plummets. Using several smaller pans instead of one large one can help stabilize things by increasing the surface area for evaporation.
Another thing to check is your hygrometer placement. If it’s too close to the water, it might be giving you artificially high readings. Moving it slightly can provide a more accurate overall humidity level. For a deeper dive into hatching, you might find this helpful: how to hatch quail eggs.
Turning Troubles: When the Eggs Stop Rolling
If your automatic turner goes on strike, don’t panic. The first thing to check is the power supply. A loose connection or a bad timer can easily stop the whole system. Next, inspect the turning mechanism itself. Is anything jammed or sticking? Sometimes a little lubrication is all it needs.
I once had a turner motor burn out mid-incubation. It was a close call, but my backup manual turning system saved the hatch. Having a Plan B is always a good idea!
Recognizing Early Warning Signs: The Incubator Whisperer
Learning to spot early warning signs can prevent minor issues from becoming major disasters. Keep a close watch on your temperature and humidity readings, looking for any patterns. For instance, if you see a consistent temperature dip in the mornings, you can adjust your heating element to compensate.
Don’t forget to check the eggs themselves. Too much condensation can point to humidity problems, while a dry, cracked shell might mean the humidity is too low.
Fixing vs. Starting Over: The Big Decision
Let’s face it: sometimes an incubator just won’t cooperate. If you’re constantly fighting issues and your hatch rates are low, it might be time for a new build. I know it’s not easy, but sometimes it’s the best way forward. Think of it as a chance to learn from your mistakes and improve your next design.
Preventative Maintenance: The Incubator Spa Day
Regular maintenance is like giving your incubator a spa day, and it can prevent most problems before they start. Clean it thoroughly between hatches, getting rid of dust and debris that can affect heating and ventilation. Check all the wiring and connections to ensure everything is secure. And don’t forget to calibrate your thermometer and hygrometer regularly for accurate readings. A little preventative care goes a long way!
Ready to start hatching? HatchingEggs.eu offers premium hatching eggs from carefully selected breeding stock, backed by over 18 years of experience. Whether you’re a backyard hobbyist or a seasoned breeder, we’re here to support your hatching journey.