


What You Need to Know Before Getting Started
Deciding to raise pheasant chicks on a whim is a surefire way to run into problems. This isn’t just a quick weekend project; it’s a real commitment to a creature that behaves very differently from your standard backyard chicken. Pheasants are naturally skittish and driven by instinct, demanding a unique approach to care. Chickens have been bred over centuries to be relatively calm, but pheasants still have much of their wild spirit. This means they get stressed easily, are prone to sudden flight, and need a specific environment to prevent problems like feather pecking and fighting.
Before you even consider buying chicks, you need a firm grasp of what you’re getting into. It’s more than just providing food and water—it’s a serious investment of your time, space, and money. Your success will depend on your ability to anticipate their needs and create a calm environment right from the start.
Pheasants vs. Chickens: The Core Differences
Many people new to pheasants assume their experience with chickens will be enough. While some skills overlap, understanding the differences is what really sets you up for success.
- Temperament: Pheasants are much more nervous and less forgiving of mistakes. A sudden loud noise can trigger a panic, potentially leading to injuries or stress-related illnesses.
- Space Requirements: They need significantly more room. Overcrowding is a major trigger for aggression and disease, far more so than with most chicken breeds.
- Flightiness: Pheasants are strong fliers, even from a young age. This is non-negotiable: your brooder and any future pens must be securely covered to stop them from escaping.
- Dietary Needs: To support their fast growth and feather development, pheasant chicks need a starter feed with a higher protein content, typically around 28-30%. Standard chick crumb just won’t cut it.
Legalities and Local Considerations
Another vital check is your local regulations. In the UK, pheasant rearing is closely tied to the gamebird industry, and there might be specific rules you need to follow, depending on your reason for keeping them and where you live. To give you some context, it was estimated that in 2020, around 39 million pheasants were released for shooting seasons. While your setup is likely much smaller, it’s good practice to check with your local council for any by-laws on keeping gamebirds. You can get a sense of the scale of pheasant rearing in this report from whatthesciencesays.org.
Are You Starting with Eggs or Chicks?
You have two starting points: day-old chicks or fertile eggs. Beginning with chicks means you skip the tricky and sometimes disappointing process of incubation. But, if you’re looking for a challenge and want to see the entire process through, incubating your own eggs can be incredibly satisfying. If you go down the incubation route, getting your technique right is essential. For a great step-by-step tutorial, you might want to look at our guide on how to incubate pheasant eggs. This choice will shape your initial setup, so think carefully about the pros and cons based on your experience level and the equipment you have.
Creating the Perfect Brooder Environment
After all the initial planning, this is where the theory behind raising pheasant chicks meets reality. Your brooder isn’t just a box; it’s the entire world for your chicks during their most vulnerable stage. Getting this environment right from day one dramatically improves your chances of success and prevents many of the common issues that cause keepers to stumble. Think of it as building a secure, comfortable, and stimulating nursery that meets all their instinctual needs.
The scale of your operation will naturally influence your design. A hobbyist raising a dozen chicks in a back garden has different constraints than a larger setup. However, the core principles remain the same: security, cleanliness, and ample space. The sheer number of pheasants reared annually highlights the importance of refined techniques. Every year, the pheasant shooting industry in England releases huge numbers of birds, with data from the Animal and Plant Health Agency (APHA) indicating that approximately 40 million Common Pheasants are released each year for this purpose alone. While your goals may differ, the successful mass-rearing operations have perfected brooder efficiency, something we can all learn from. You can find more details on the scale of pheasant rearing in these insights from Protect the Wild.
Choosing Your Brooder and Flooring
The actual brooder can be anything from a large plastic tote or a repurposed stock tank to a custom-built wooden box. The key is that it must be easy to clean, free from draughts, and have solid, high sides. Pheasant chicks are surprisingly athletic and can jump higher than you’d expect, so a secure lid made of mesh or hardware cloth is non-negotiable. This not only keeps the chicks in but also keeps predators—and curious house pets—out. For a small batch of chicks, a circular design is ideal as it prevents them from piling into corners, which can lead to suffocation. A simple fix for a square brooder is to add cardboard inserts to round off the corners.
The floor of the brooder is just as important. A slippery surface like plain plastic or newspaper can cause a condition called splayed leg, where the chick’s legs slide out to the sides, leading to permanent deformity. You need to provide a textured surface that offers good grip. For the first few days, many keepers use paper towels or old t-shirts. After about three days, once the chicks have learned to distinguish food from flooring, you can switch to a more permanent bedding.
While many keepers use wood shavings, a word of caution is needed. Fine dust from some shavings can cause respiratory problems, and tiny chicks might ingest small particles, leading to fatal gizzard impaction. The best practice is to use large, kiln-dried pine flakes. They are virtually dust-free, highly absorbent, and safe for chicks.
To help you visualise the space required, here’s a breakdown of brooder specifications based on the number of chicks you’re raising.
Brooder Setup Specifications by Flock Size
Essential measurements and requirements for different sized pheasant chick operations
| Flock Size | Brooder Area | Heat Source | Ventilation | Feeder Space |
|---|---|---|---|---|
| Up to 25 Chicks | 10 sq ft (~1 sq m) | 1 x 250W Heat Lamp | 4-6 small holes in lid | 24-inch trough feeder |
| 25-50 Chicks | 25 sq ft (~2.3 sq m) | 1-2 x 250W Heat Lamps | 8-10 small holes in lid | Two 24-inch trough feeders |
| 50-100 Chicks | 50 sq ft (~4.6 sq m) | 2 x 250W Heat Lamps | Screened lid section | 100-inch total feeder space |
| 100+ Chicks | 100+ sq ft (~9.3+ sq m) | Gas brooder or multiple lamps | Controlled air vents | 2 inches per bird |
This table shows how quickly your space and equipment needs grow. Planning ahead ensures you won’t be caught out when your flock starts to get bigger.
Essential Layout and Equipment
Your brooder layout should be organised to minimise contamination and promote natural behaviours. Place feeders and waterers away from the direct heat source. This prevents the water from getting too warm, which can encourage bacterial growth, and keeps the food from spoiling.
Here’s a practical layout for your brooder:
- Heat Source: Position your heat lamp or ceramic heat emitter at one end of the brooder, not in the centre. This creates a temperature gradient, allowing chicks to move closer to the heat when they are cold and further away to cool down.
- Feeders and Waterers: Place these at the opposite, cooler end. This encourages the chicks to move around and helps keep the bedding underneath them drier. Using specific chick feeders and waterers designed to prevent chicks from climbing in and soiling them is a worthwhile investment.
- Enrichment: Even at a young age, pheasants benefit from simple enrichment. Adding a small, stable branch or a few bundles of straw can provide shelter and a place to perch, redirecting behaviours that might otherwise lead to feather pecking.
Getting Temperature Right Every Time
Of all the things to master when raising pheasant chicks, getting the temperature just right is by far the most crucial. I’ve seen more keepers lose chicks to improper heating than any other single issue. These tiny birds are completely reliant on you for the warmth their mother would provide, and there’s very little room for error. A thermometer is your starting point, but your chicks’ behaviour is the ultimate guide. Learning to read their body language is the key to success.
Your chicks will tell you everything you need to know. If they’re all bunched up directly under the heat lamp, they’re telling you they’re cold. If they’re scattered to the far corners of the brooder, panting with their beaks open, they’re far too hot. What you want to see is a picture of calm activity—some chicks snoozing under the lamp, some exploring the cooler areas, and others happily eating or drinking. This shows they can comfortably manage their own body temperature.
Creating a Temperature Gradient
This ability to self-regulate is why a temperature gradient is so important. Instead of hanging your heat source right in the middle, place it towards one side of the brooder. This simple tweak creates a range of temperatures, from a hot spot directly under the lamp to a cooler zone at the other end. For day-old pheasant chicks, the hot spot needs to be around 35-37°C (95-98°F), measured right at chick level. Don’t just hang a thermometer near the top; get it down on the bedding where the chicks live to get an accurate reading.
After the first week, you can start to dial back the heat by about 3°C (5°F) each week. You’ll continue this until the brooder reaches the same temperature as the room or until the chicks are fully feathered and ready for the next stage.
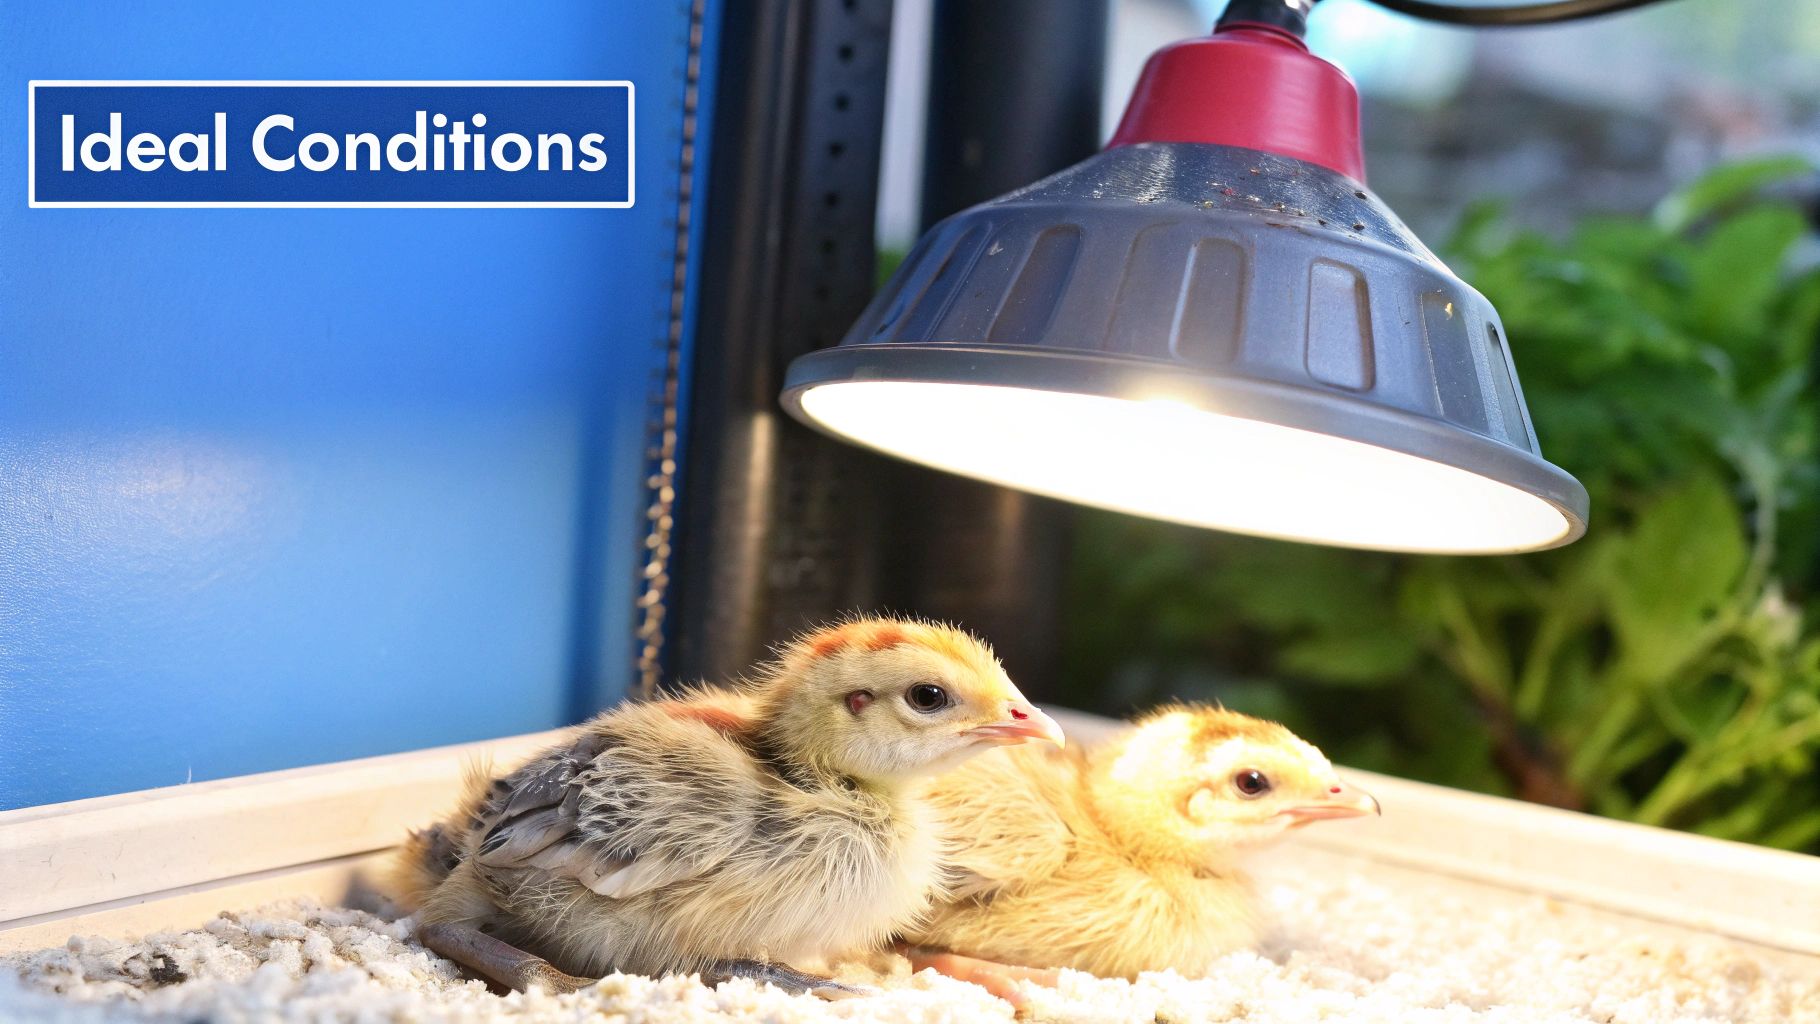
This screenshot shows a classic brooder setup with a heat lamp providing warmth for young birds.
What’s crucial to note here is how the lamp is positioned to one side, allowing the chicks to move in and out of the heat as needed.
Choosing Your Heat Source
The kind of heat source you use can also make a big difference. Let’s look at the most common options:
- Traditional Heat Lamps: These are the standard, affordable choice, usually with a 250-watt red bulb. I prefer red bulbs over white ones because the dimmer light seems to cut down on feather pecking and aggression among the chicks. The major downside is the fire risk; they must be securely fastened to prevent them from falling into the bedding.
- Ceramic Heat Emitters (CHEs): These screw into a normal lamp holder but only produce heat, not light. This makes them fantastic for providing warmth around the clock without messing with the chicks’ sleep patterns. They get very hot to the touch, so always use them with a protective wire guard.
- Radiant Heat Panels: Often known as “brooder plates,” these are designed to act like a mother hen. Chicks huddle underneath the warm plate when they need heat and come out to eat and drink. They are incredibly safe, use very little energy, and promote more natural behaviour. They cost more upfront, but their safety and efficiency make them a favourite for many serious keepers.
Whatever you choose, investing in a reliable thermostat is a smart move. While they are essential for tools like an automatic egg incubator, a thermostat can also be connected to your brooder’s heat source to keep the temperature steady, giving you real peace of mind. Always have a backup plan, too. A power cut on a cold night can be a disaster. A spare heat source or a plan for moving the chicks somewhere warm in an emergency can be a true flock-saver.
Feeding Strategies That Actually Work
Getting the feeding right for your pheasant chicks is a delicate balance of science and hands-on observation. It’s much more than just keeping the feeders full; you need to understand their nutritional demands at every stage of their incredibly fast growth. The first few days are especially important, as a good start lays the groundwork for a strong, healthy flock. A misstep here can cause a ripple effect of issues, from stunted growth to a higher risk of illness.
When your chicks arrive, they’re usually a bit stressed and confused after their journey. Your immediate task is to get them eating and drinking. A great trick I’ve used is to sprinkle a little feed on a paper towel for the first day or so. The sound of a few chicks pecking at the paper attracts the others, quickly teaching them what food is. For water, placing a few shiny marbles in the drinker can work wonders. The glint of light catches their eye and encourages them to take that first crucial sip.
The Right Feed at the Right Time
Pheasants have different dietary needs than chickens, so you can’t just give them standard chick crumb. They require a much higher protein diet to support their rapid development, especially in the first few weeks. Using a lower-protein feed will result in weaker, slower-growing birds. Always opt for a specialised game bird feed.
I’ve found the best approach is to follow a clear step-down plan as they mature:
- Weeks 0-4 (Starter Crumbles): For the first four weeks, a high-protein starter feed is non-negotiable. Look for one with around 28-30% protein. This gives them the essential building blocks they need.
- Weeks 5-8 (Grower Pellets): As they grow, you can switch to a grower feed with a slightly lower protein level, usually about 20-22%. It’s important to make this change gradually. I mix the new feed with the old over a week, slowly increasing the amount of grower feed each day to prevent digestive problems.
- Weeks 9+ (Finisher/Maintenance Feed): Once they’re almost fully grown, you can move them onto a finisher or maintenance diet containing about 18-20% protein.
This gradual reduction in protein mimics their natural dietary shifts and supports healthy, steady growth without over-taxing their systems. To help you keep track, here is a handy schedule that breaks it all down.
Pheasant Chick Feeding Schedule by Age
Comprehensive feeding guidelines showing feed types, quantities, and frequencies for different growth stages
| Age (Weeks) | Feed Type | Protein % | Daily Amount | Feeding Frequency |
|---|---|---|---|---|
| 0-4 | Starter Crumbles | 28-30% | Ad libitum (free choice) | Constant access |
| 5-8 | Grower Pellets | 20-22% | Ad libitum (free choice) | Constant access |
| 9-16 | Finisher Pellets | 18-20% | Ad libitum (free choice) | Constant access |
| 17+ | Maintenance Feed | 16-18% | ~100g per bird | Once or twice daily |
This table shows that young chicks need constant access to food, known as ad libitum feeding, to fuel their growth. As they mature, their intake becomes more regular, and you can switch to scheduled feedings.
Preventing Disease Through Nutrition
A well-nourished chick is a resilient one. Many health problems can be linked directly to dietary shortfalls or poor feeding practices. The infographic below highlights the most common ailments in pheasant chicks, many of which are made worse by stress from a poor diet.
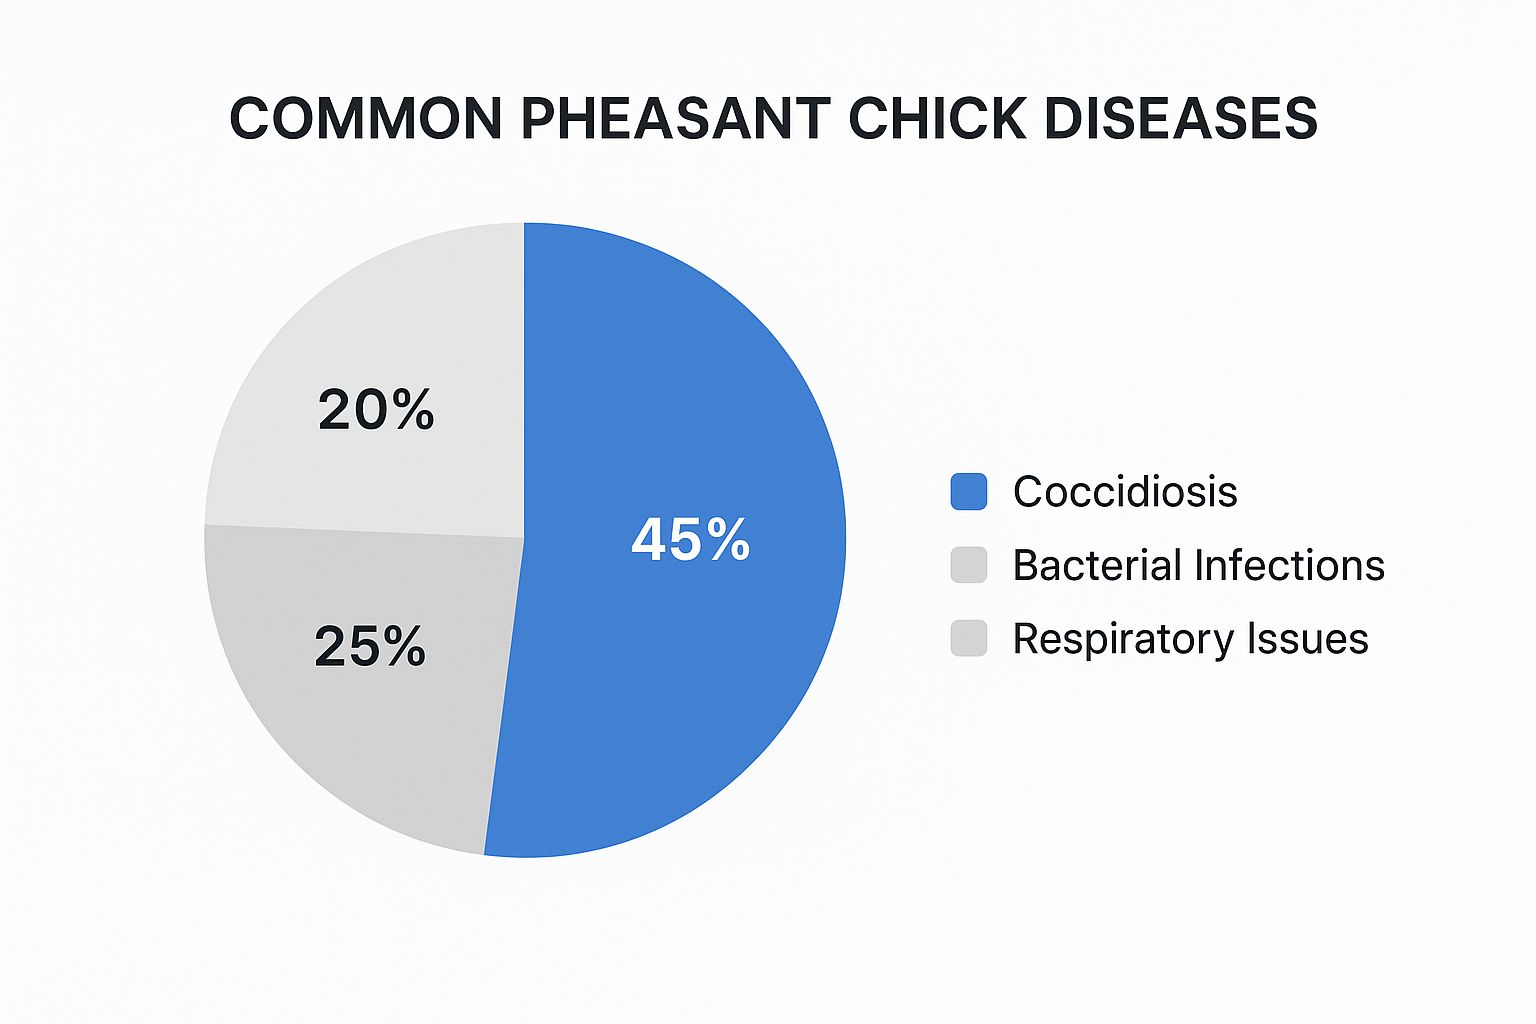
As you can see, Coccidiosis is the biggest threat, accounting for 45% of common issues. While caused by a parasite, its effects are much more severe in birds with weakened immune systems. This is why many high-quality game bird starter feeds are medicated with a coccidiostat. Whether to use medicated feed is an important decision. If you’ve had Coccidiosis problems before or are raising many birds together, it’s a sensible precaution.
The large-scale poultry industry, which includes game birds, often adjusts its methods based on market demands and seasonal factors. This can affect the types of feed available and even chick sourcing for smaller keepers. You can get a sense of these broader trends by looking at this government report on UK hatchery activity. While the scale is different, the core principles of good nutrition are universal. You’ll notice many similarities in early care across different game birds; for example, you can see how our guide on how to hatch quail eggs covers similar ground.
Keeping Your Chicks Healthy and Thriving
When you’re raising pheasant chicks, your most powerful tool isn’t found in a medicine cabinet; it’s your own keen observation. Health issues in these delicate birds can appear with startling speed, and a problem with one chick can quickly spread through the entire brooder. The real key to raising a healthy flock is to become a daily detective, learning to spot the small signs that something isn’t right long before it becomes a full-blown emergency.
Your daily health check needs to be more than just a quick peek. Take a few minutes to simply watch your chicks. A healthy chick is a busy chick—it’s curious, active, and always ready for a meal. You should see bright, clear eyes, clean nostrils, and a tidy vent area. They move with purpose, whether they’re scratching around in the bedding or making a dash for the feeder. Any change from this energetic baseline is your first clue. A chick that keeps to itself, seems sleepy, has ruffled feathers, or ignores food and water needs your immediate attention.
Biosecurity: Your First Line of Defence
The term biosecurity might sound a bit formal, but it’s really just common sense practices to stop germs from getting into your brooder in the first place. Since you are the most likely person to carry in unwanted bacteria or viruses, a few simple habits can make all the difference.
- Dedicated Footwear: Keep a pair of boots or wellies that you only wear when you’re in with your pheasants. Don’t wear the same shoes you use for other poultry or that you’ve worn for a walk around the garden.
- Hand Washing: Always wash your hands properly with soap and water before and after you handle the chicks, their feed, or their waterers.
- Quarantine New Birds: If you plan on adding new birds to an existing flock, a strict 30-day quarantine in a completely separate area is essential. There are no shortcuts here.
- Limit Visitors: Be very careful about who comes into your brooder. Friends and family can unknowingly bring in germs on their shoes or clothes.
These small actions create a protective bubble around your vulnerable chicks, significantly lowering the risk of devastating illnesses like Coccidiosis or Avian Influenza.
Common Health Issues and What to Do
Even with the most careful management, you might still face health problems. Knowing what to look for means you can act fast. One of the most frequent issues with young birds is pasting up, which is when droppings stick to and block the vent. This is often a sign of stress, perhaps from being slightly chilled. If you spot this, you must gently clean the area with a soft cloth and warm water, being very careful not to pull on their delicate skin.
As the birds grow and prepare to move outside, internal parasites become a bigger worry. While pheasants have unique needs compared to chickens, the basic principles of parasite management are similar. If you also keep chickens, you might find our guide on how to worm chickens useful for understanding the general approach.
If you have a seriously ill bird, isolating it immediately is critical to stop the illness from spreading. A small “hospital pen” with its own food, water, and heat source is a vital piece of equipment. This gives the sick chick a quiet place to recover without being picked on by its healthier flock mates. Finally, one of the smartest moves you can make is to find a good avian vet before you actually need one. Having their number ready can be a real lifesaver when you’re dealing with a problem you can’t fix on your own.
Moving Chicks to Their Outdoor Home
The big move from the warmth of the brooder to the great outdoors is a huge moment in raising pheasant chicks. This transition is where all your careful work really pays off, but it’s also a point where things can go wrong if you rush it. Success depends on getting the timing just right and making the process as stress-free as possible for your birds. Forget about marking a specific date on the calendar; your pheasants will let you know when they’re ready. I look for birds that are fully feathered, which is usually around 6-8 weeks old. Their downy fluff should be gone, replaced by sleek, weatherproof feathers that can handle a bit of a chill and a light shower.
This stage is all about gradual change. Just imagine being moved from a constantly warm room straight into a variable outdoor pen – it would be a shock! The key is acclimatisation. A few days before the final move, I start what I call ‘hardening them off’. This simply means switching off the brooder heat lamp during the day, as long as the indoor temperature is mild. This gets them used to natural temperature shifts. If your brooder is portable, you could even move it into a sheltered outdoor space like a shed or open garage for a few days so they can get used to the sounds and smells of the outdoors without being fully exposed.
Designing the Perfect Outdoor Pen
Think of your outdoor pen as a fortress. Pheasants are vulnerable to a whole host of predators—foxes, badgers, birds of prey, and even domestic cats and dogs. The pen must be secure from every possible angle.
- Secure Fencing: Use a sturdy, small-gauge wire mesh. Standard chicken wire might not be enough to stop a determined fox. The wire should be at least six feet high, as pheasants are surprisingly good fliers.
- A Solid Roof: Your pen absolutely must have a roof. This is non-negotiable. I use a combination of soft netting and solid panels. The netting prevents them from flying out and stops aerial predators, while the solid panels offer vital shade and shelter from the rain.
- Dig-Proofing: Predators don’t just climb; they dig. You should bury the wire mesh at least 12 inches deep into the ground around the entire perimeter of the pen. Another method is to lay a two-foot-wide wire skirt flat on the ground, pointing outwards from the base of the fence.
Inside the pen, try to create an environment that encourages natural behaviour. Don’t just leave it as an empty square. I add things like straw bales for them to climb on, small brush piles to hide in, and sheltered corners. This enrichment doesn’t just prevent boredom; it gives less dominant birds a place to escape, which helps to reduce the risk of bullying and feather pecking.
This image shows the striking plumage of an adult male pheasant—the kind of magnificent bird your chicks will grow into with the right care.
The brilliant colours and long tail feathers you see here are signs of a healthy, mature bird that has thrived from being a chick to a fully grown adult.
Managing the Transition
When moving day arrives, I try to pick a calm, overcast day. Bright sun or heavy rain can add unnecessary stress to the situation. I always move the birds in the morning to give them a full day to explore their new home before nightfall. For the first few days, I provide their familiar feeders and waterers from the brooder alongside the larger outdoor ones. This bit of continuity helps them adapt faster.
Keep a very close eye on them during this period. Watch to see if they are all finding the food and water and using the shelters. Stress can sometimes trigger health issues, like flare-ups of digestive problems. If you spot any signs of distress, our article on diarrhoea in chicks has some excellent advice on what to look for and how to respond. It’s all about close observation and quick action to ensure your flock continues to thrive in their new, more natural environment.
Solving Problems Before They Become Disasters
Even with the most careful preparation, raising pheasant chicks is rarely a straightforward journey. These sensitive birds can run into trouble quickly, but if you know the warning signs, you can step in before a small hiccup becomes a full-blown catastrophe. The real art of raising healthy pheasants isn’t just about following a guide; it’s about learning to read your flock and react accordingly. Let’s cover some of the common challenges you’re likely to face and how to handle them like a seasoned pro.
One of the most difficult situations is dealing with a weak or failing chick. Sometimes, despite everything you do, a chick just doesn’t seem to get going. It’s important to act quickly and with compassion. I always keep a small “hospital pen” ready—a separate, quiet brooder with easy access to food, water, and consistent warmth. Separating a struggling chick gives it a chance to recover without being pushed around by its stronger, more energetic flock mates. Often, this calm, stress-free environment is all it needs to turn a corner.
Managing Aggression and Feather Pecking
As pheasant chicks get older, their wild instincts start to emerge, which can sometimes lead to aggression and feather pecking. This isn’t just random meanness; it’s usually a signal that something in their environment isn’t quite right. Overcrowding is the number one cause, so your first check should always be your space. Are the birds getting at least one square foot per chick? If not, giving them more room can make a world of difference.
Space isn’t the only trigger, though. Boredom is another major contributor. Pheasants are naturally curious birds, and a bare brooder is a recipe for mischief. You can curb this by introducing simple environmental enrichment.
- Offer Distractions: Hanging a few bundles of leafy greens or even some shiny, bird-safe objects can redirect their pecking. I find that a bit of alfalfa hay works wonders.
- Provide Hiding Spots: You can create visual barriers with small branches, straw bales, or even cardboard boxes with holes cut in them. This allows less dominant birds to find a safe space and reduces the overall stress in the flock.
- Dust Baths: A shallow tray filled with dry, sandy soil provides an outlet for their natural grooming instincts and can keep them busy for hours.
Another tip I’ve found incredibly useful is to dim the lights. Brooders with bright white lights often seem to have more issues with aggression. Switching to a red heat bulb tends to have a calming effect and can significantly reduce feather pecking.
Cost-Effective Solutions and Proactive Management
Fixing problems doesn’t have to break the bank. Many solutions are about simple tweaks to your management. For example, if you notice feed being scattered and soiled, it might be your feeder design. Changing from an open trough to a feeder with smaller openings can solve this almost immediately. Likewise, if the bedding is always damp, check your waterer placement and ventilation before buying more bedding. Is the waterer too close to the heat, causing lots of evaporation? Is there enough airflow to let moisture escape?
Ultimately, the best way to handle problems is to prevent them from starting. This means building a resilient system from the very beginning. Keep detailed notes on your chicks’ growth, what they’re eating, and any health issues you notice. Over time, you’ll begin to spot patterns that help you anticipate challenges before they happen. This forward-thinking approach turns potential disasters into valuable learning experiences, making you a more confident and successful pheasant keeper.
At HatchingEggs.eu, we believe success starts with superior genetics and robust stock. Our carefully selected hatching eggs give your future flock the best possible start, building a foundation of health and vitality that helps them overcome challenges. Explore our premium pheasant eggs and begin your journey with confidence.