


Essential Equipment for Successful Quail Egg Incubation
So, you’re eager to embark on your quail-raising journey? Fantastic! Having the proper equipment before you begin is essential. Your choice of tools can significantly impact your hatch rate and the overall health of your new chicks. Let’s explore what you’ll need for a successful incubation.
Choosing Your Incubator
The incubator is the core of your setup. There are two primary types: still-air and forced-air. Still-air incubators are typically less expensive, but they require more careful monitoring to ensure even temperature distribution. Forced-air incubators, equipped with built-in fans, provide more consistent temperatures but often come with a higher price tag. Selecting the right incubator depends on your budget, the size of your quail batches, and your preferred level of hands-on involvement. Interestingly, many experienced UK breeders favor manual turning and monitoring, believing it yields better results.
Essential Supporting Tools
Several additional tools, while not strictly required, can significantly enhance your hatching success. A hygrometer accurately measures humidity inside the incubator – a crucial element for successful incubation. An egg candler allows you to monitor embryo development, enabling early identification of any potential problems. While sometimes seen as optional extras, these tools offer invaluable insights and can significantly boost your hatch rate. Creating the optimal environment for your developing quail involves more than just the incubator; it’s about the entire support system.
Incubation Best Practices
In the UK, a typical hatch rate at home is around 75-80%, especially when using fresh, locally sourced eggs. This achievable target relies heavily on maintaining the correct temperature (approximately 37.5°C) and humidity (45-55%), along with regularly turning the eggs. The typical incubation period for quail eggs is 17-18 days. Learn more about incubating and hatching quail eggs.
Comparing Incubator Options
To help you choose the best incubator for your needs, the table below summarizes key features and typical price ranges in the UK. It’s important to compare the options to find the best fit for your experience level and budget.
Incubator Types Comparison: A comparison of different incubator options for quail eggs, including price ranges, features, and suitability for beginners.
| Incubator Type | Price Range (£) | Key Features | Capacity | Beginner-Friendly Rating |
|---|---|---|---|---|
| Still-Air | 20-50 | Basic temperature control, manual turning | 12-24 eggs | Moderate |
| Forced-Air | 50-150 | Fan-assisted airflow, automatic turning (optional) | 24-100+ eggs | Easy |
| Cabinet Incubator | 150+ | Advanced temperature and humidity control, automatic turning and hatching trays | 100+ eggs | Advanced |
As this table shows, there’s a wide range of incubators available, catering to different needs and budgets. Still-air incubators are an economical starting point, while cabinet incubators offer advanced features for larger-scale hatching.
Investing in the right equipment is the first step toward successfully hatching quail. Careful planning and the right tools will put you well on your way to welcoming a healthy brood of quail chicks.
Selecting and Preparing Eggs for Optimal Results
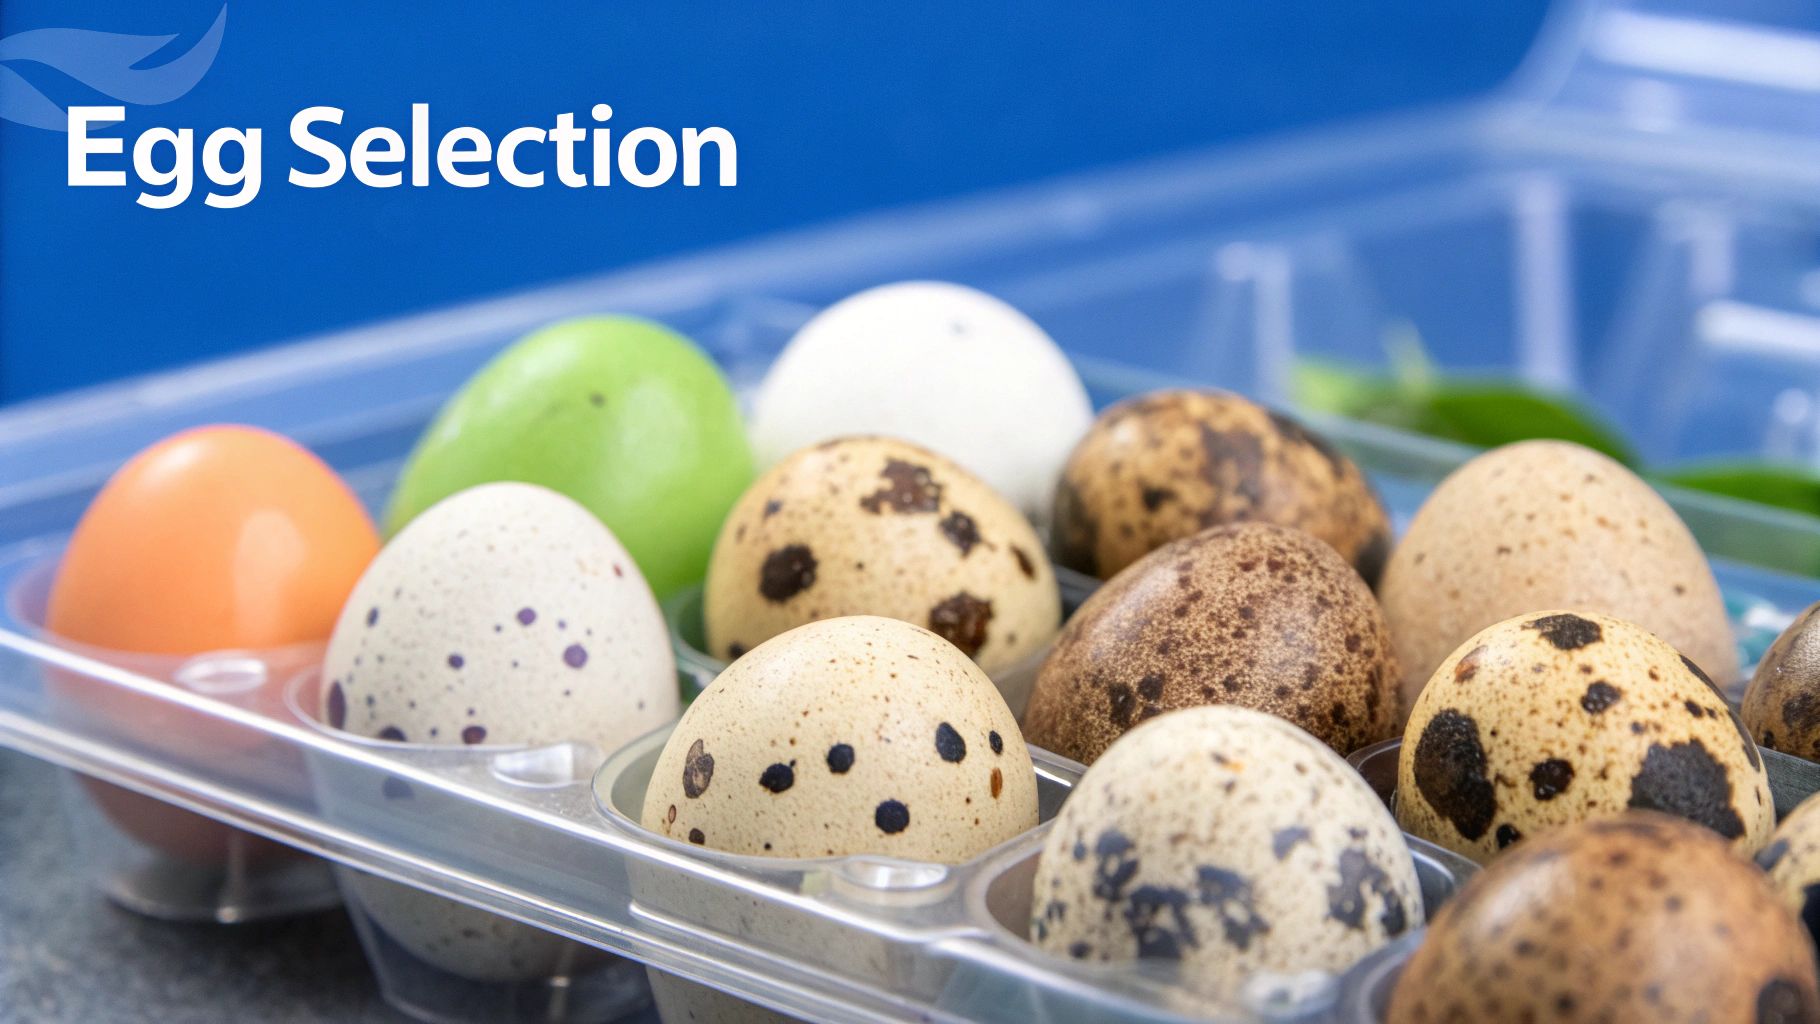
The success of your quail egg incubation depends heavily on the quality of the eggs you choose. This crucial step is often overlooked by beginners. Selecting the right eggs and preparing them correctly can significantly boost your hatch rate.
Evaluating Egg Quality
Begin by carefully examining the eggshell. Look for a clean, smooth surface, free from any cracks or unusual shapes. A thick, strong shell is a good indicator of a healthy egg, better equipped to protect the developing chick inside.
Also, pay close attention to the overall egg shape. Avoid eggs that are overly long, perfectly round, or oddly shaped. Ideally, quail eggs should be slightly pointed at one end. These simple visual checks help ensure the egg’s structural integrity.
Cleaning and Storing Eggs
Cleaning your eggs is essential, but it’s important to do it gently. While it’s good to remove dirt, excessive cleaning can damage the bloom. This is a protective layer that naturally prevents bacteria from entering the egg. A slightly damp cloth is generally all you need for effective cleaning. You may also find this helpful: How to select the best eggs for hatching.
After cleaning, store your eggs pointy end down in a cool environment. The ideal temperature is between 10-15°C. This position helps maintain the yolk’s integrity and improves the chances of a successful hatch.
Research conducted in the UK indicates that game quail eggs stored at 15.8°C with 80% relative humidity maintain good hatchability for up to 28 days. After this point, hatchability begins to decline. For example, at 35 days, the hatch rate decreases by roughly 50%. You can explore this topic further here.
Tracking Your Eggs
A good tracking system is invaluable, especially if you’re working with eggs from multiple sources or different breeding lines. This allows you to monitor each line’s performance and make more informed decisions about your breeding program.
Before setting up your incubation equipment, adopt a drone pre-flight checklist approach. This ensures all your preparatory steps are complete. Simple methods, like marking eggs with a pencil or using a spreadsheet, can significantly simplify this process.
By carefully selecting, cleaning, storing, and tracking your eggs, you’re laying the groundwork for a successful hatch. These seemingly minor details can have a major impact on your overall results, leading to a greater number of healthy quail chicks.
Mastering Crucial Environmental Parameters

This infographic illustrates the key stages in quail egg incubation, from initial placement to candling and hatching. These milestones represent critical points where monitoring and adjusting environmental factors is essential for success.
The journey from egg to chick is a delicate process. Understanding these stages helps you anticipate the developing embryos’ needs and adjust your incubation parameters accordingly. For example, candling at day 7 lets you identify and remove non-viable eggs, protecting the healthy embryos.
Temperature and Humidity: A Delicate Balance
Maintaining the correct temperature is crucial for successful incubation. The ideal temperature is around 37.5°C. Even small deviations can significantly impact your hatch rate. A drop of just a few degrees can drastically reduce the number of successful hatches, while overheating can be fatal. Many experienced breeders use multiple thermometers in their incubators to ensure accurate readings and even heat distribution.
Humidity is just as important as temperature, but often trickier for beginners to manage. The recommended humidity level for quail egg incubation is between 45-55%. Proper humidity prevents the membranes inside the egg from drying out, which could hinder hatching. Small adjustments, like adding a water container inside the incubator or slightly opening a vent, can make a big difference.
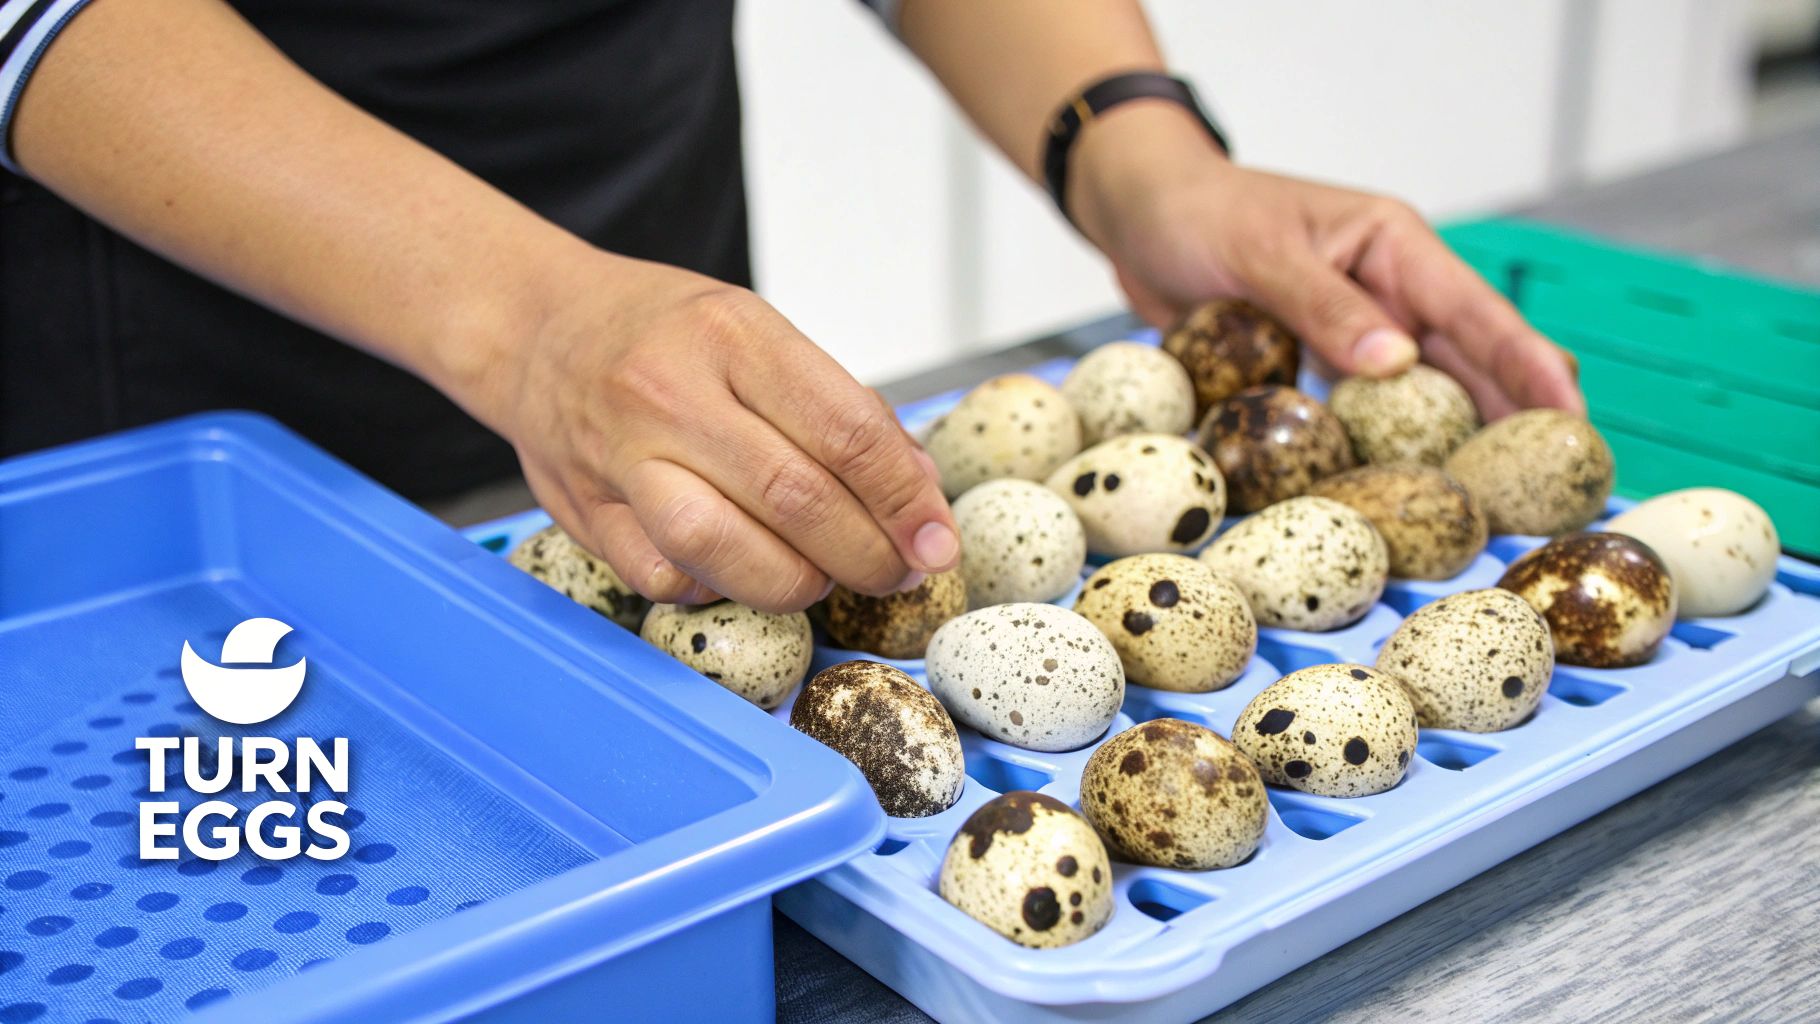
Ventilation and Egg Turning: Essential for Healthy Development
Proper ventilation is essential for providing oxygen to the developing embryos. However, too much ventilation can cause temperature fluctuations. Finding the right balance is key, and many incubators offer adjustable vents for fine-tuning airflow.
Regularly turning the eggs is also vital. This mimics the natural turning a mother quail would do and prevents the embryo from sticking to the shell. Most automatic incubators have built-in turning mechanisms. If you’re using a manual incubator, you’ll need to turn the eggs at least three times a day. Can hatching eggs get cold? offers more insights into temperature management.
The following table details the day-by-day incubation schedule for quail eggs, outlining the necessary temperature, humidity, turning requirements, and special considerations for each day of the 18-day cycle.
Quail Egg Incubation Schedule
| Day | Temperature (°C) | Humidity (%) | Turning Requirement | Special Considerations |
|---|---|---|---|---|
| 1-7 | 37.5 | 50-55 | 3 times per day | Ensure consistent temperature and humidity |
| 8-14 | 37.5 | 50-55 | 3 times per day | Candle eggs on day 7 to check for development |
| 15-17 | 37.5 | 60-65 | Stop turning | Increase humidity to prepare for hatching |
| 18 | 37.5 | 65-70 | N/A | Hatching should begin |
This schedule highlights the importance of increasing humidity in the later stages of incubation to facilitate a smooth hatch. Consistent monitoring and adjustments based on this schedule are key for maximizing your hatch rate.
Achieving Incubation Success
By carefully controlling these environmental parameters – maintaining consistent temperature and humidity, ensuring adequate ventilation, and regularly turning the eggs – you’ll significantly improve your chances of a successful hatch. These details play a crucial role in healthy embryo development and ultimately, your overall hatching success.
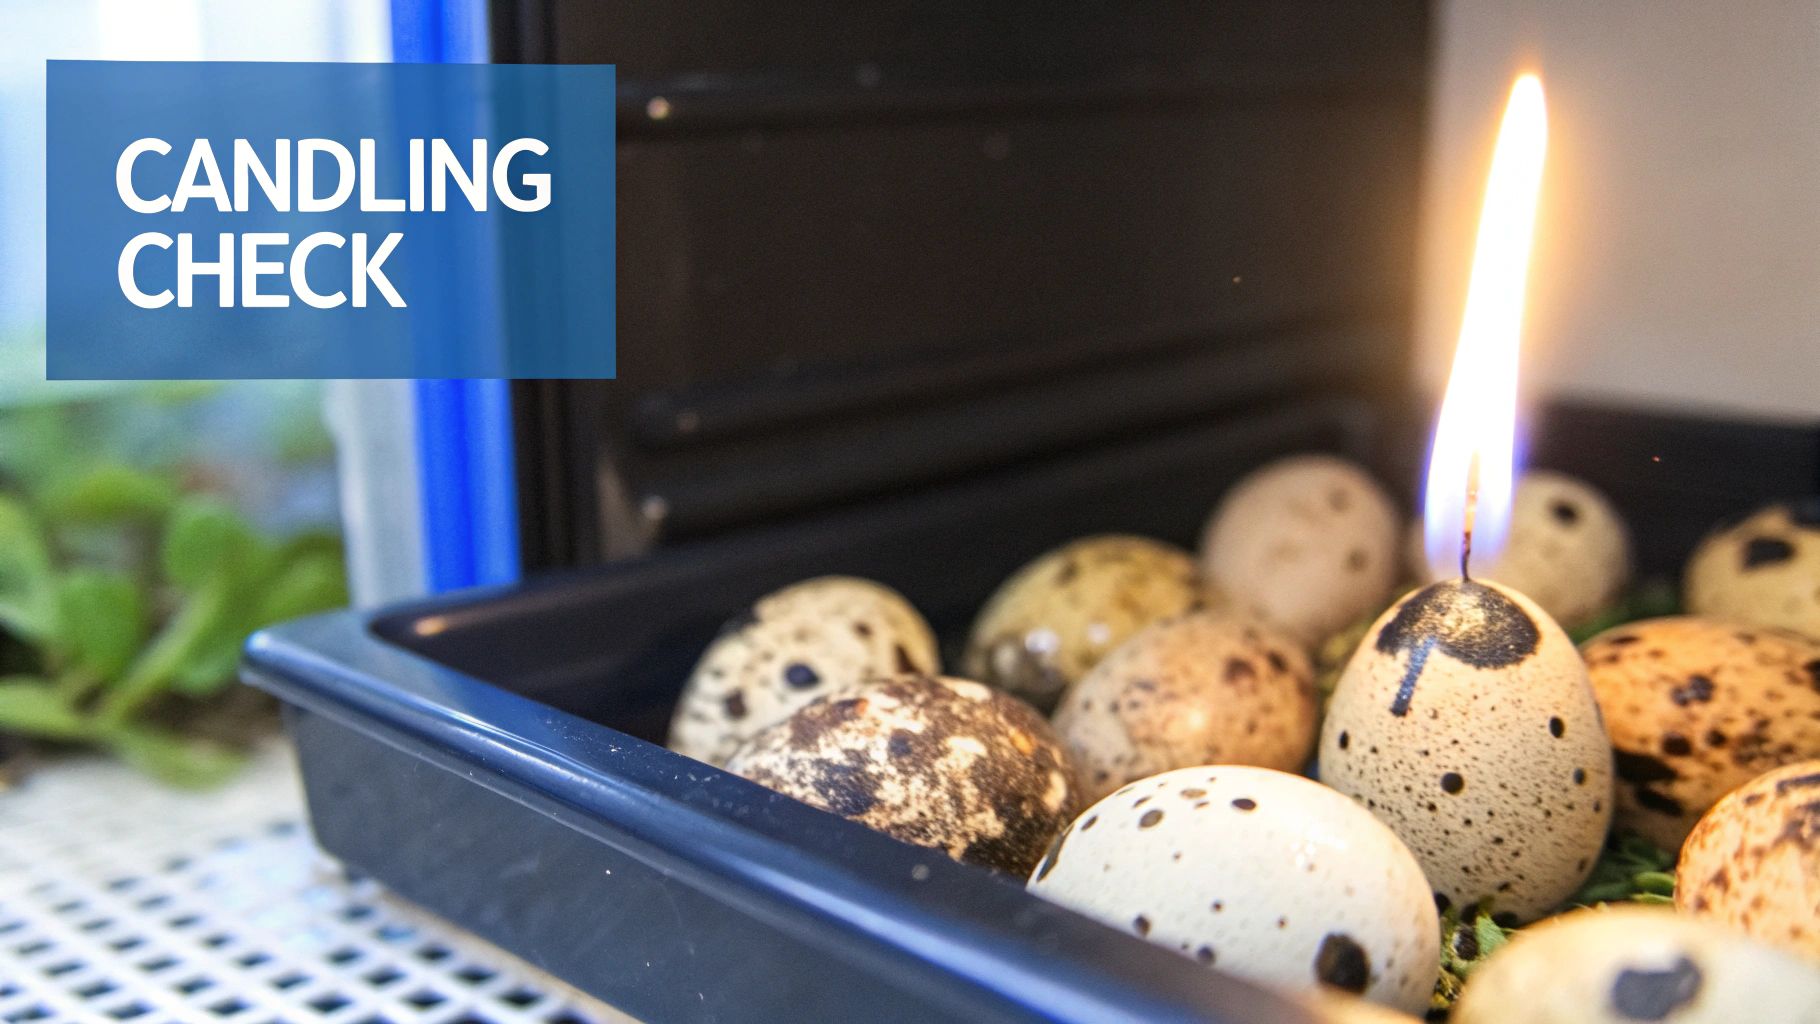
Monitoring Development Through Effective Candling
Candling, the process of shining a bright light through an egg, is essential for quail egg incubation. This simple technique offers a glimpse inside the egg, allowing you to track embryonic development without disturbing the delicate environment within. It’s a powerful tool for ensuring the health and viability of your quail eggs.
Optimal Candling Times and What to Look For
The ideal times to candle quail eggs are on days 5, 10, and 14 of incubation. On day 5, look for the initial development of blood vessels, a clear sign of a growing embryo.
By day 10, the embryo should be more prominent, occupying a larger space within the egg.
Finally, on day 14, you might observe movement and even discern the outline of the developing chick. This stage is a particularly rewarding milestone for breeders.
Identifying Healthy Development vs. Problems
Experienced quail breeders quickly learn to differentiate between healthy growth and potential problems. A healthy embryo exhibits a network of blood vessels and a dark, expanding shape.
However, warning signs, such as a blood ring (a visible circle of blood inside the egg), indicate embryonic death. Another concern is stalled growth, where development doesn’t progress as expected.
A UK family in Bromley remarkably hatched 12 chicks from a box of 24 supermarket quail eggs in 2020. Their 50% hatch rate showcases the possibility of hatching even store-bought eggs. Read more about their story here.
Candling Quail Eggs: Practical Tips
Candling quail eggs presents specific challenges due to their small size and often speckled shells. A bright, focused light source is essential for clear visibility.
Adjust the light intensity carefully. Enough light is needed to see inside, but too much heat can harm the developing embryo. Handle the eggs gently during candling to avoid disturbing the chick. For further reading, check out this helpful resource: How to master preventing hatching eggs from getting wet.
The Benefits of Removing Non-Viable Eggs
Removing non-viable eggs early is crucial for a healthy hatch. It prevents the spread of bacteria or fungi from deceased embryos, safeguarding the remaining healthy eggs. This is particularly important in smaller incubators where contamination can spread rapidly.
Removing non-viable eggs also helps maintain a stable incubator environment. This is achieved by minimizing the build-up of gases released by decaying embryos.
By mastering candling and applying these tips, you significantly improve your chances of a successful hatch and a healthy brood of quail chicks. Consistent monitoring and prompt action based on your observations are key to maximizing your incubation success.
Navigating the Critical Hatching Phase
The final 48 hours of incubation are a thrilling culmination of your efforts. This delicate period requires close attention as your quail chicks prepare to emerge. This guide will walk you through what to expect and how to best support your new arrivals.
Recognizing Normal Hatching Progression
The hatching process unfolds in distinct stages. First, internal pipping occurs when the chick breaks through the inner membrane into the air cell. Next, the chick breaks through the outer shell in a process called external pipping. This entire process can take several hours, sometimes even a full day. You’ll observe small cracks appearing in the eggshell as the chick progresses. A healthy chick will work steadily, making slow but consistent progress.
Humidity Adjustments During Hatching
Maintaining proper humidity is crucial during hatching. A humidity level around 65-70% softens the shell, aiding the chicks’ exit. Too much humidity, however, can create a sticky environment, hindering their movement. Conversely, low humidity can dry out the membranes, trapping the chicks. Experienced breeders often add a small, warm water-soaked sponge to the incubator during this phase to maintain optimal humidity.
When and How to Intervene
It’s generally best to allow the hatching process to unfold naturally. Interfering prematurely can be detrimental. However, if a chick has been pipped for more than 24 hours with no further progress, careful assistance might be necessary. For more information on egg care, you might be interested in this article: Can hatching eggs be washed?.
If intervention is unavoidable, create a small opening near the air cell, exercising extreme caution to avoid blood vessels. This allows the chick to breathe and potentially continue hatching independently. Remember, intervention should only be a last resort.
Post-Hatch Care Within the Incubator
Once hatched, allow the chicks to remain in the incubator until they are dry and fluffy, usually a few hours. Maintaining a stable temperature of approximately 37.5°C is essential during this time. These newly hatched chicks are vulnerable, and temperature fluctuations can be harmful.
Resist the urge to move the chicks to a brooder immediately. Allowing them to dry and strengthen within the incubator’s stable environment significantly boosts their survival rate.
Key Takeaways for Hatching Success
This critical hatching phase requires patience and observation. By understanding the normal hatching progression, maintaining appropriate humidity, knowing when to intervene (and when not to), and providing proper post-hatch care, you’ll maximize your hatch rate. This knowledge will empower you to confidently navigate this final stage and enjoy the rewards of healthy quail chicks.
Troubleshooting Common Quail Egg Incubation Challenges
Even experienced quail breeders in the UK sometimes encounter issues during incubation. This section provides practical solutions to common problems, drawing on advice from seasoned quail keepers.
Identifying and Addressing Common Issues
Low hatch rates can be discouraging. A frequent cause is inconsistent temperature. Even small variations can dramatically affect the number of successful hatches. Another common problem is chicks dying in the shell, often because of incorrect humidity during hatching. Developmental issues and hatching difficulties can also stem from factors like poor egg quality.
Diagnosing the Root Cause
Successful breeders take a methodical approach to troubleshooting. They thoroughly check the incubator environment for temperature and humidity imbalances. They also assess egg turning practices and the quality of the eggs. Is the turning mechanism functioning properly? Were the eggs stored correctly before incubation? These are key questions experienced breeders consider when issues arise. You might find this helpful: How to master getting started with hatching eggs.
Evaluating Unsuccessful Hatches
When a hatch is disappointing, it’s crucial to understand what happened. Examine the unhatched eggs closely. Were the chicks fully developed but unable to pip? This could indicate a humidity problem during the hatch. Did the embryos die early? This might suggest temperature fluctuations or problems with the eggs themselves.
Learning From Experience: Real UK Examples
Many UK breeders have overcome substantial incubation hurdles. Some have found that using two thermometers, placed in different areas of the incubator, provides a better understanding of temperature distribution. Others highlight the importance of regularly calibrating hygrometers for accurate humidity readings. Sharing these experiences allows breeders to learn from one another, constantly improving their techniques and hatch rates.
Temperature Fluctuations: A Common Culprit
Temperature fluctuations are a major issue in quail egg incubation. Several factors can contribute, including malfunctioning thermostats, unreliable power supply, or poor incubator placement. For example, an incubator near a drafty window or in direct sunlight can experience significant temperature swings.
Humidity Imbalances: The Hatching Hurdle
Humidity is especially critical during hatching. Low humidity can dry out the membranes inside the egg, preventing chicks from emerging. High humidity can create a sticky environment that restricts their movement. Achieving the correct humidity is essential for successful hatching.
Egg Quality Problems: Starting Strong
The quality of the eggs is paramount for successful incubation. Eggs with thin or cracked shells are vulnerable to bacterial contamination. Older eggs have lower hatch rates. Using fresh, high-quality eggs from reliable sources greatly improves the chances of a good hatch.
By systematically evaluating these aspects, breeders can make adjustments for future hatches and improve their results. Troubleshooting is a continuous process of learning and refinement.
Ready to begin your own quail hatching adventure? HatchingEggs.eu offers premium quail hatching eggs from select breeding stock, delivered across Europe. Visit their website to learn more and order your eggs today!
Article created using Outrank